The Ultimate Guide to Deploying a Shiny App on AWS
One of the most frequent requests I get from my clients is to create an app with R Shiny that enables its users to visualize plenty of indicators and to interact with the data.
Rather basic for a Shiny app.
Having a background in statistics, I learned over the past few years how to create cool dashboards to make my clients happy!
Except… when they asked me to deploy it on his server.
That’s when things got complicated.

Writing R code or creating Shiny dashboards has become easy to me.
But hosting an app?
Well.. that’s not my job.
Intro
The “stupid” method
The first time I faced the issue, the team I worked with decided on a completely different solution.
We had no idea how to set up a server, nor the skills to do it anyway, so… we had to find another way.
It’s not pretty.
Be prepared.
…
We installed R and the Shiny app on each user’s computer.
Yep.
That’s what we did.
Every time we wanted to give access to a new user, we had to go to his desk, install R on his machine, the libraries, the data, create a shortcut on his desktop…
When you think about it, we were quite creative!

But also incredibly stupid…
- We still needed a way to share the data.
- It took forever to install the app for each user.
- It was hell to maintain.
But we had no choice.
No skills, and no help from the IT department.
Today, I know there exists a wayyy better solution.
The “smart” method
It’s easy:
- Create a server in the cloud.
- Send the app there.
- Profit.
That’s all.
.
Ok, ok… I may be oversimplifying it.
It’s not that easy the first time.
But once you know how to do it, you can make it work in half an hour.
Really.
It is that simple.
And today, with this guide, my goal is to teach you exactly how to host a Shiny app on an AWS server.
So, where to start?
First, we’ll use AWS.
AWS is for Amazon Web Services, i.e. all the services from Amazon in the cloud.
Of course, you could use other services, such as Azure from Microsoft, Digital Ocean, Rackspace, etc.
Doesn’t matter.
But AWS is the most popular tool.
It’s a handy skill to have.
Plus: When you create a new account on AWS, you have free access to some services for a whole year.
Hence, everything we’ll do in this guide can be done for free.

The benefits of this smart method are:
- You can deploy the app without moving from your chair.
- It’s easy to maintain and update.
- You can upgrade your server at any time.
- You can customize security and user access.
What should you expect from this guide?
My goal is to write the ultimate guide on deploying a Shiny app on a server. Whenever you ask yourself How can I host a Shiny app? you can come back here and find the answer.
Until you remember exactly how to do it.
But I know from experience it’s easy to forget. So don’t hesitate to come back when you need.
I will explain each step with plenty of details, screenshots, drawings, maybe even videos!
Here are the steps:
In Part 1, we’ll get a basic Shiny app. It’s not exactly the goal of this guide to learn how to build a Shiny app, so we’ll get an already existing one.
In Part 2, I will show you how to create a new server in AWS. That’s the only part that is specific to AWS, but really you could use any other provider. I’m not even using AWS anymore nowadays.
In Part 3, you will learn how to install R and R Shiny on your brand new server. After you’re done with this chapter, you will have a working server and even already a Shiny app available on the internet.
In Part 4, we’ll deploy our app on the server so that it becomes available to all.
I could have stopped here. These steps are enough for a basic deployment. Except you will probably still have a few questions. That’s why I added more:
In Part 5, you will get a domain name. Yup, so far you had to type an IP address to access the app.
In Part 6, things are getting a bit more complicated. We’ll install nginx, generate TLS certificates, and secure you app with HTTPS. You didn’t understand any of the words of the previous sentence? No problem, every step will be detailed.
In Part 7, we will finally learn how to protect the app with a password. Not everyone want to have their app open to the world. I will show you different possibilities for different needs.
And then you’ll be good to go!
Let’s get started!
1. Create a Shiny app
It’s not exactly the goal of this guide to teach you the Shiny framework.
So instead of spending time on that, let’s use an an app that already exists.
I chose the movie explorer from the Shiny gallery:
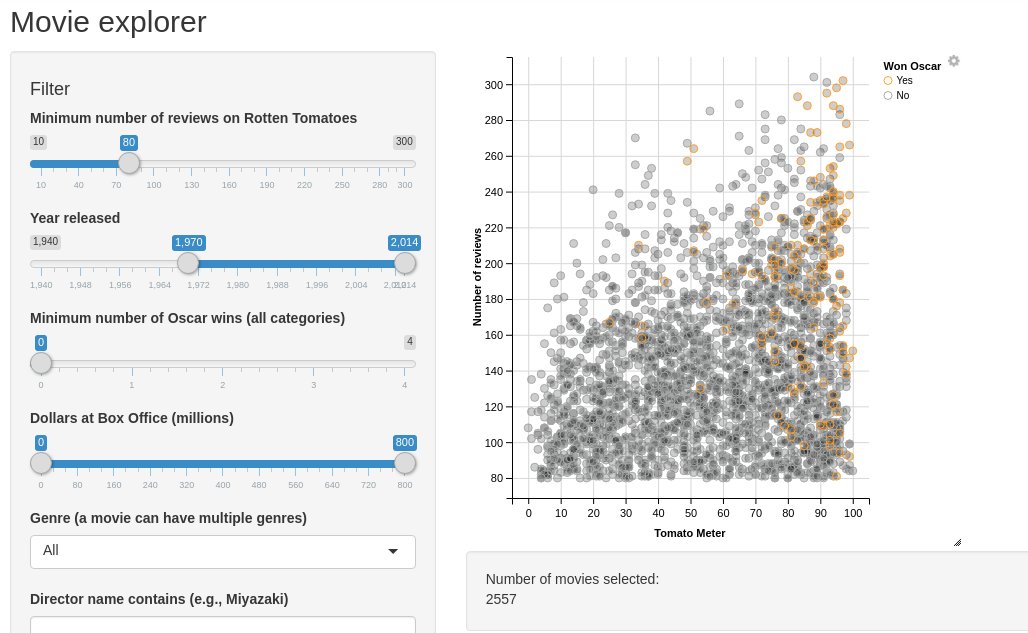
And I created a Gitlab repo that you can clone it easily: https://gitlab.datachamp.fr/charles/051-movie-explorer
Note that you’ll need git and a console for this tutorial. You can download git here: https://git-scm.com
Uh.. that’s it? We’re done already?
Yup! Enjoy as long as it’s easy.
2. Create an AWS server
In this chapter, we are going to create an AWS server to host our app.
Create a free AWS account
The first step is to create an account on AWS.
Visit https://aws.amazon.com and create an account.
The steps are easy to follow so I trust you can do it by yourself!
Note that Amazon will ask for a payment method since for every paid service you use, you’ll need to pay for it.
But don’t worry.
When you open a new account, some services are free so that you can try them without burning any cash!
In fact, everything we’ll do in this tutorial can be achieved for free.
Create your first server on EC2!
Once your account is created, log in and you’ll land on a page with all the available services:
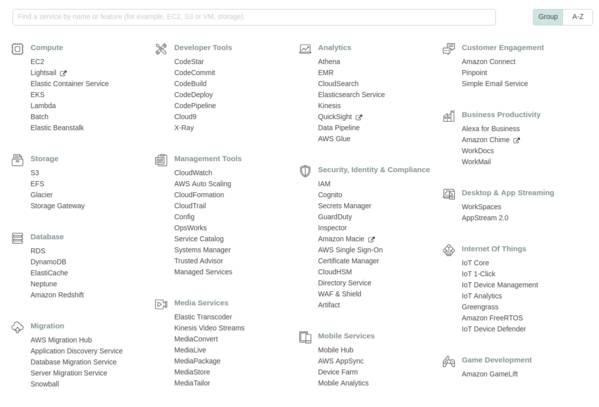
In the search box, type EC2.

EC2 means Elastic Compute Cloud.
It’s basically a service in the cloud that is used for computation. Plus, it’s elastic, meaning you can stretch its power as much as you want. It’s flexible.
You can use it to:
- create web services (like hosting a website, or …. a Shiny app!)
- do computations (such as training a machine learning model)
- store data
S3 is better to store data, but you’ll still need to put a bit of data on your EC2 machine, like your R scripts!
The huge advantage of this service is that you can change the configuration at any time.
Today we won’t need a powerful server for our Shiny app.
But if tomorrow you want to run a heavy script on multiple cores, that’s not a problem. Simply upgrade the machine, run the script, and downgrade the machine again once you don’t need it anymore.
That’s it.
You’ll pay the powerful machine only for the couple of hours you used it.
Super convenient.
But anyway.
We’re not here for that.
Let’s create your first server!
In the search box, type EC2 and enter the service.
To the left, in the menu, click on Instances. An instance is a server.
And then, click on Launch Instance.
Step 1: Choose your AMI
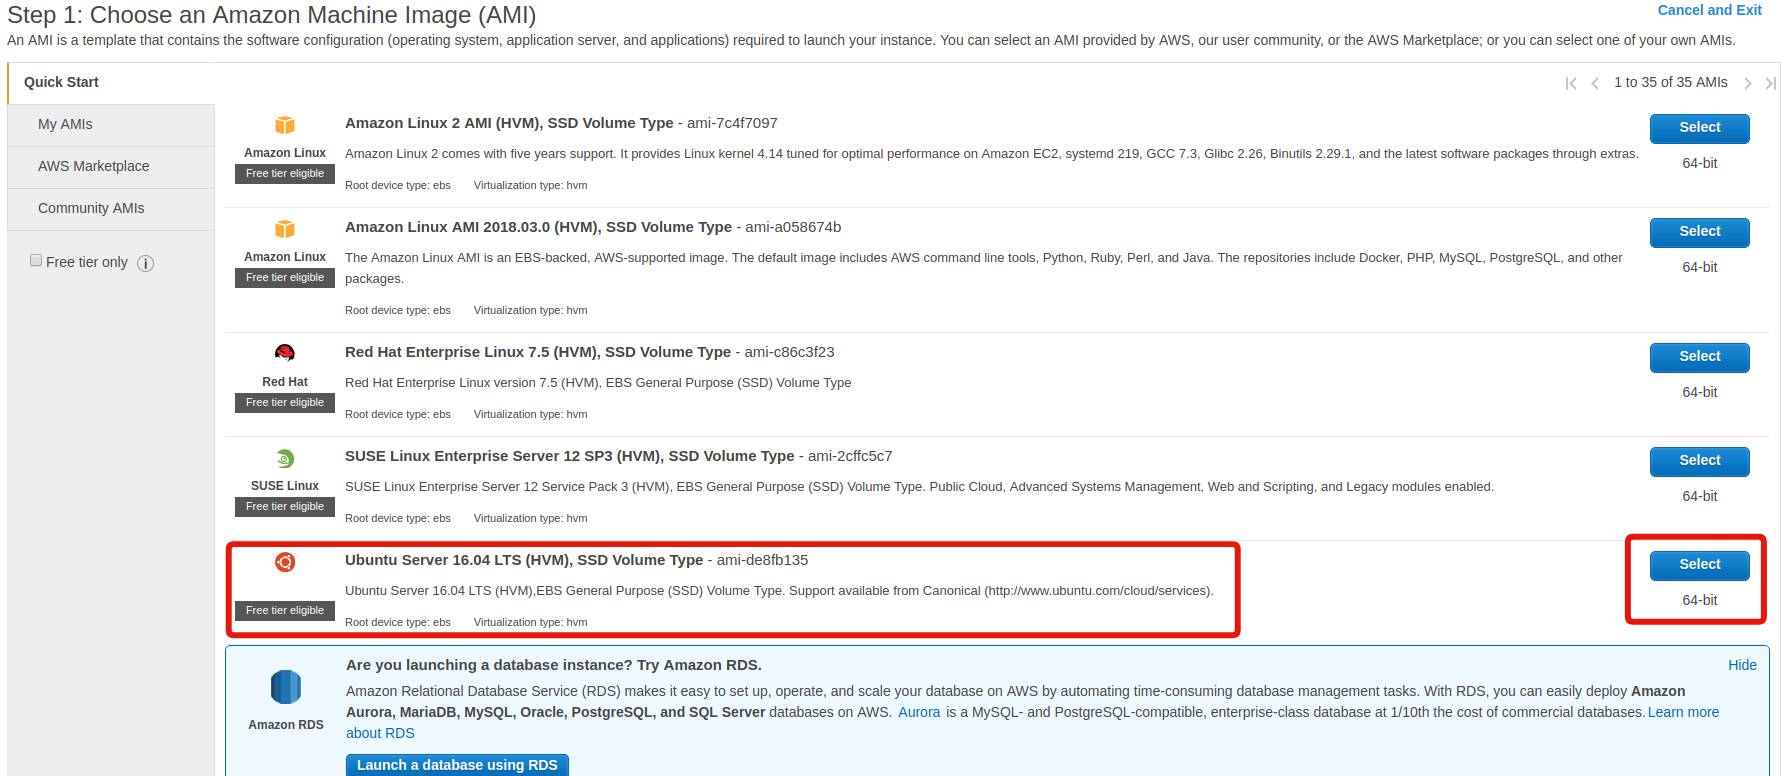
An AMI, for Amazon Machine Image, is a pre-packaged server with plenty of useful tools aleardy installed.
Some AMIs are prepared by Amazon.
You can create your own.
And you can even rent some to third-party companies (for example with proprietary software inside).
We’ll use a very basic AMI, the Ubuntu Server 18.04 LTS.
Click on Select.
Step 2: Choose your instance type
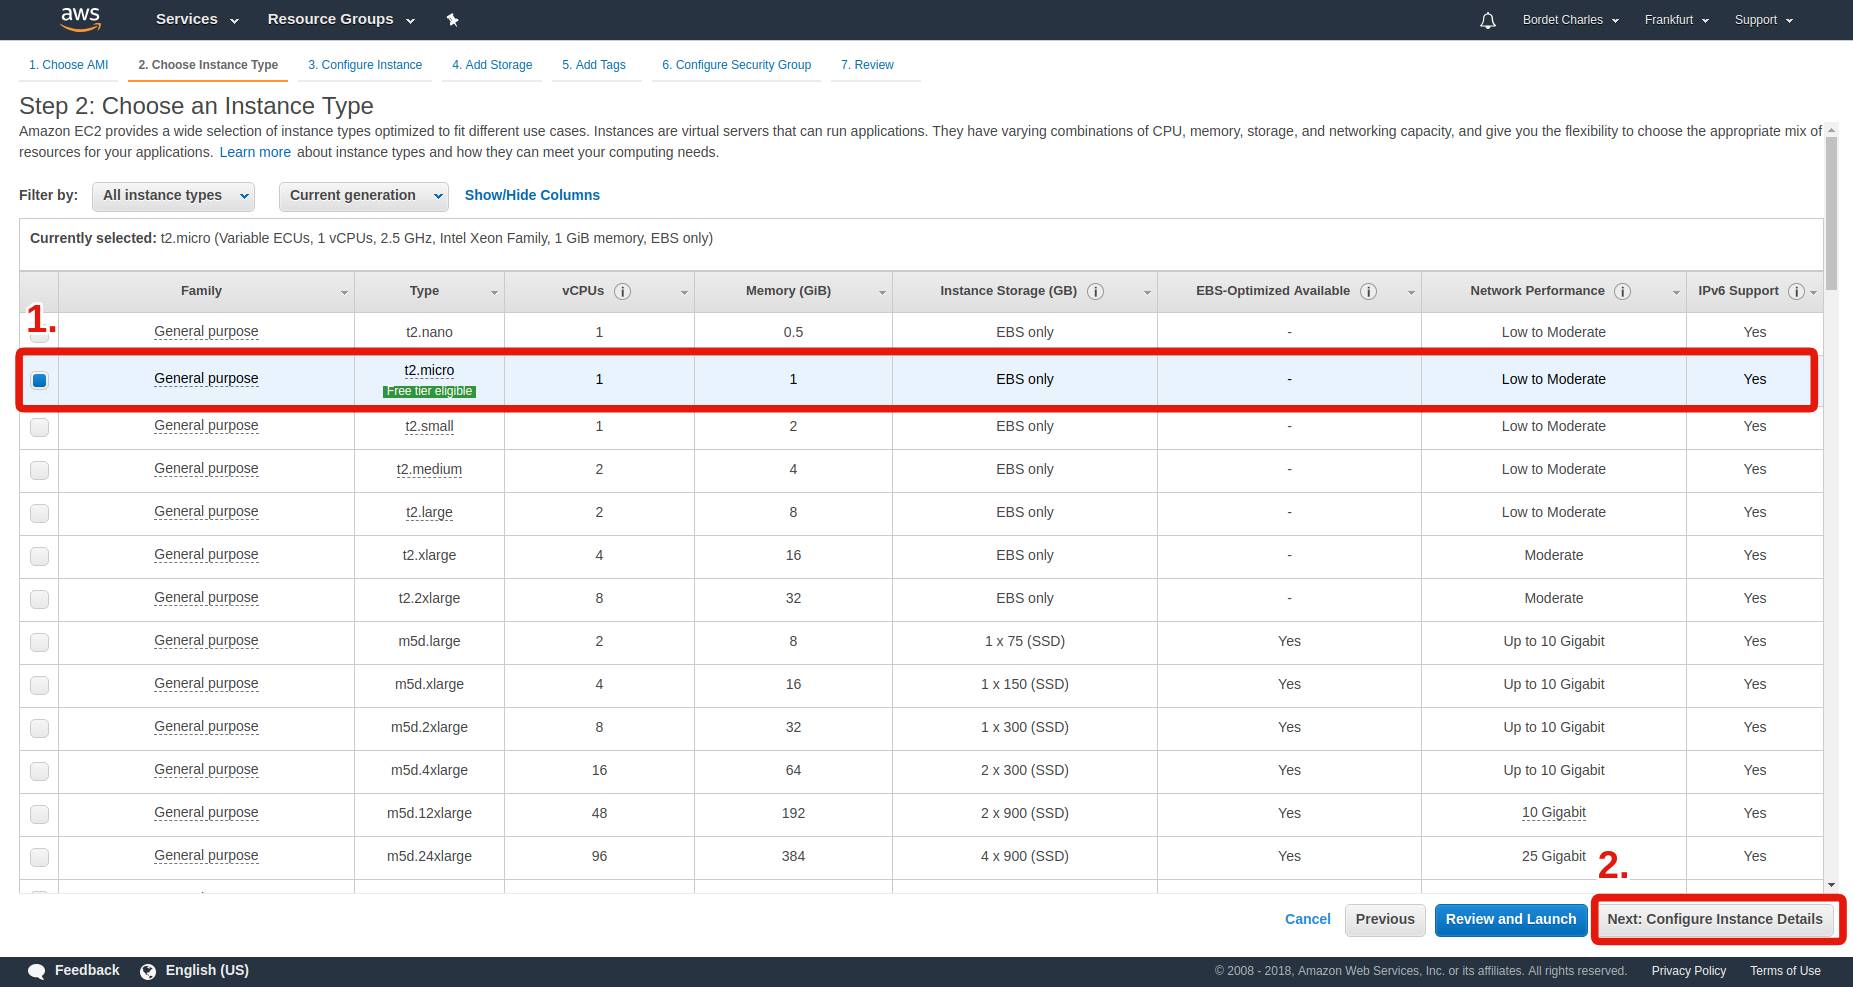
The instance type corresponds to the power of your machine.
Do you need a small one or a very powerful one?
In this guide, no need for a costly one.
We will use the t2.micro type since it’s the only one that you can use for free when you have a new account.
It contains a CPU with only 1 core, only 1 GB of RAM, and an okay internet connection.
That will be enough for us. But if at some point you want to upgrade and you’re not sure which one to pick, simply visit the Amazon EC2 Instance Types.
Then, click on Next: Configure Instance Details.
We won’t modify anything in the next screen, so directly click on Next: Add Storage.
Step 3: Choose the storage size
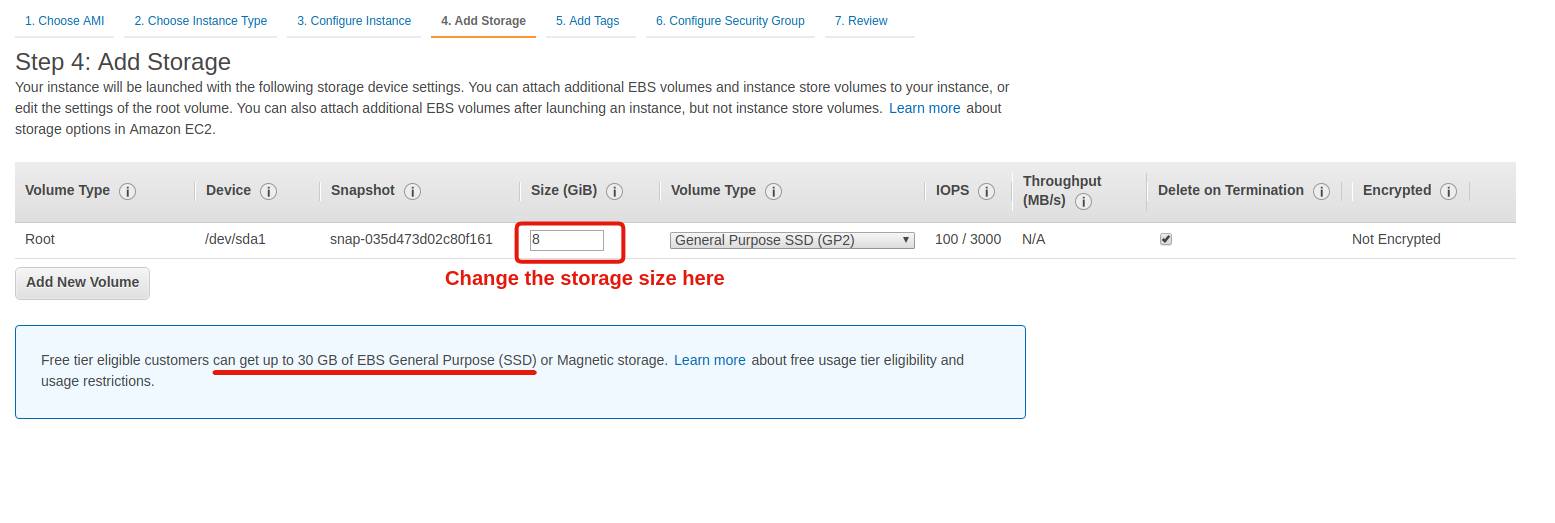
By default, AWS gives you 8 GB of space.
It’s up to you to decide whether you’ll need more or not.
Note that to stay within the free offer of a new account, you can to keep it below 30 GB.
For this tutorial, you can keep it at 8 GB.
Now, config is done!
You can click on Review and Launch!
A final screen will summarize all the options you picked. Give it a look and validate the launch of your instance by clicking on Launch!
Step 4: Create a key pair
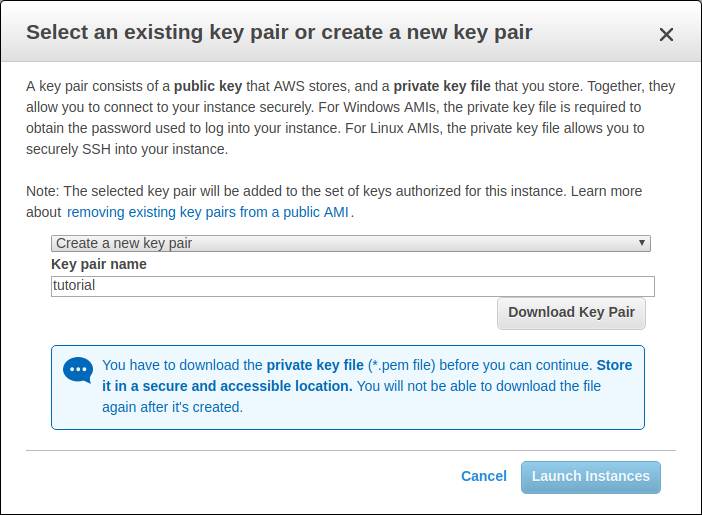
Oh well… Yet another screen. What’s this thing with keys?
It’s simply a way to protect the access to your server.
Since it’s connected to the Internet, you can’t really keep the door open, or anyone will mess up with your server.
Not cool.
Instead, you’ll create a key pair in the form of a file that you’ll keep on your computer.
Every time you want to connect to your instance, you show up this file and you’ll get access.
Important: Do not lose this file. If you do, you will lose access to your server at the same time and you’ll have to restart from scratch!
Pick a name for your key, and download it.
Congrats! You have created your first server!
After a few seconds, your instance will be ready and you’ll see it in the Instances menu.

In the next chapter, we’ll see how to connect to your server with SSH and we’ll install R and R Shiny on it!
Keep reading !
3. Install R and R Shiny on your new server
In the previous chapter, we stopped right after the creation of your first server on AWS.
In this new chapter, you’ll learn:
- how to access the server with SSH
- how to install R and R Shiny Server on it
How to access your new server?
Once your instance is created, AWS will display a Connect button. If you click on it, you get something like that:
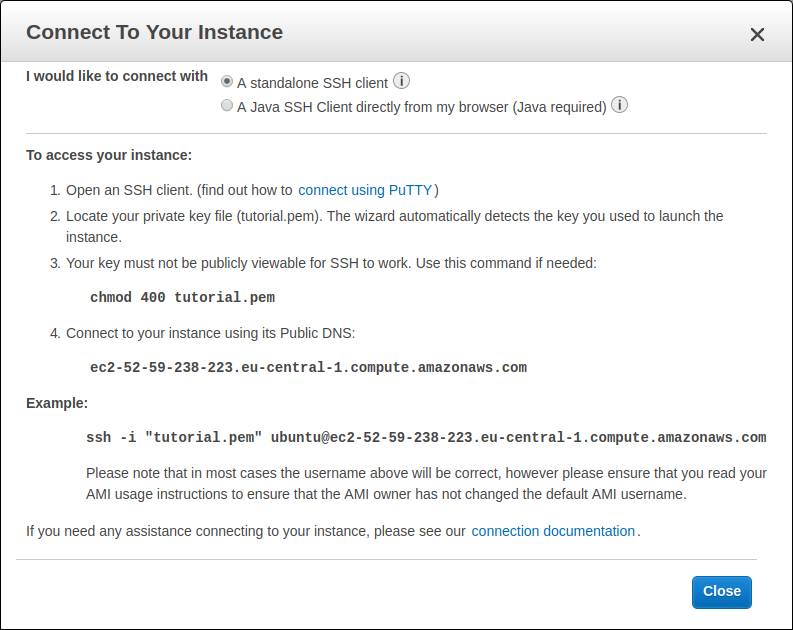
These are the instructions to connect to your server.
But it’s not that easy, so let’s take it slowly. Plus, it’s different depending on your OS.
For Windows users
If you’re on Windows, you need to download an SSH client, since the OS doesn’t have one natively.
The most common one is PuTTY, which you can download on https://www.putty.org/.
Next, you have to transform the key you downloaded in the previous chapter. Remember, the file with the pem extension.
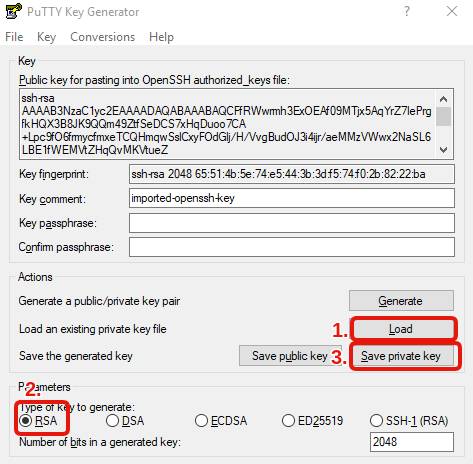
- Run PuTTYgen (type “PuTTYgen” in the start menu)
- Choose RSA.
- Select the pem file that you downloaded (you need to activate the option to see all file types).
- Save the private key with the same name of your pem file (except the extension will be different, with ppk).
Then, run PuTTY and configure it with what AWS told you:
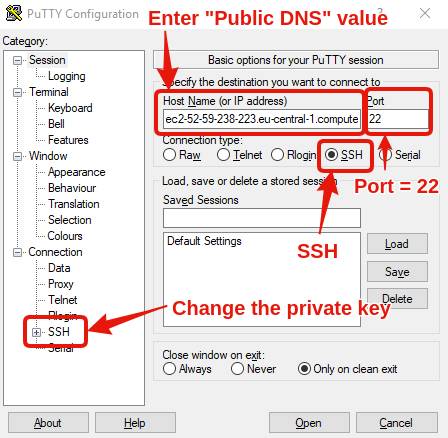
- In Host Name (or IP address), copy/paste the value you find at the 4th step of the above screenshot (for me, it’s ec2-52-59-238-223.eu-central-1.compute.amazonaws.com).
- Port: 22
- Connection type: SSH
- Go to Connection/SSH/Auth, and load the ppk key that you saved a few seconds ago.
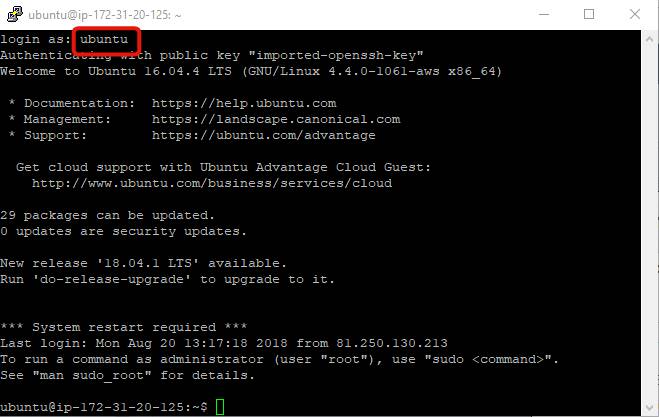
Finally, click “Open”, type “ubuntu” when you’re asked login as, say “Yes”, and a console will open!
That’s it.
You’re in!
For Ubuntu and Mac users
If you’re not on Windows, things are way easier.
Open a console, change the directory to be in the one that contains the pem key, and type the instruction given by AWS.
For example, for me it’s:
$ cd Downloads/
$ ssh -i "tutorial.pem" ubuntu@ec2-52-59-238-223.eu-central-1.compute.amazonaws.com
Say “yes”, and you’re in!
If you get an error message such as “WARNING: UNPROTECTED PRIVATE KEY FILE!”, it’s normal. You have to change the rights of the file by typing:
$ chmod 400 tutorial.pemHow to install Shiny Server
Next step is to install Shiny Server.
And of course, before that, we need to install R!
The Ubuntu repos contain an outdated version of R. So instead, we first add the CRAN repo:
$ sudo apt-key adv --keyserver keyserver.ubuntu.com --recv-keys E298A3A825C0D65DFD57CBB651716619E084DAB9
$ sudo add-apt-repository 'deb https://cloud.r-project.org/bin/linux/ubuntu bionic-cran35/'
Once it’s done, the CRAN repo is added and you can install R:
$ sudo apt update
$ sudo apt install r-base r-base-dev
Once R is installed, we also need to install the shiny package before installing Shiny Server.
Run R in admin mode and install the package:
$ sudo R
> install.packages("shiny")
You can quit R by typing q() and n.
Ok.
That’s progress.
Final step: Download the last version of Shiny Server.
Go on https://www.rstudio.com/products/shiny/download-server/ and scroll down at the bottom of the page to see the instructions, with the version number.
For me, it’s:
$ sudo apt-get install gdebi-core
$ wget https://download3.rstudio.org/ubuntu-14.04/x86_64/shiny-server-1.5.13.944-amd64.deb
$ sudo gdebi shiny-server-1.5.13.944-amd64.deb
The last two lines might be different if a new version is released.
Once you launch everything, say “yes”, and everything will get installed!
That’s it!
You don’t know it yet, but you already have a Shiny app running on your server now.
How do I see it?
That’s what we’ll see in the next part…
4. Deploy the app on the server
Let’s recap.
- We built a Shiny app and sent it on Gitlab.
- We created an AWS account to rent a server.
- We prepared the server to welcome our app.
At the end of the previous chapter, I said you already had a Shiny app running on your server!
Indeed, it appeared by installing Shiny Server.
1. How to access the default Shiny app?
To access it, two steps:
- Find the IP address on your server.
- Open the port 3838 on the firewall.
Find the IP address on your server
When you start a new AWS server, an IP address is automatically affected to it.
Warning: The IP address changes each time you reboot the server. If you want a fixed IP address, you’ll need to visit the Elastic IP section and allocate an address to your server.
In your EC2 dashboard, there is a column IPv4 Public IP.
Find it and note the IP address.

For me, it’s 3.121.42.9 (the link will not work, I shutdown the server after publication of the guide).
And to access the Shiny app, you just need to type this address in your browser AND specify the port number: 3838.
3.121.42.9:3838Except… it doesn’t work.
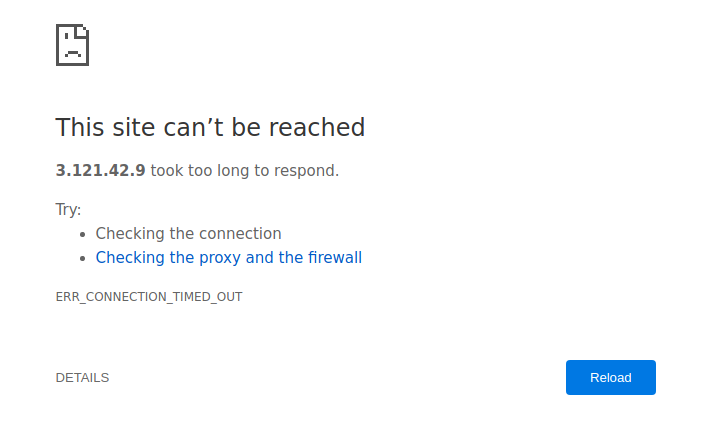
Open the port 3838 on the firewall
The reason is that for security reasons, AWS blocks all the ports except 22 by default. Port 22 is the one we used to access the server via SSH in the previous chapter.
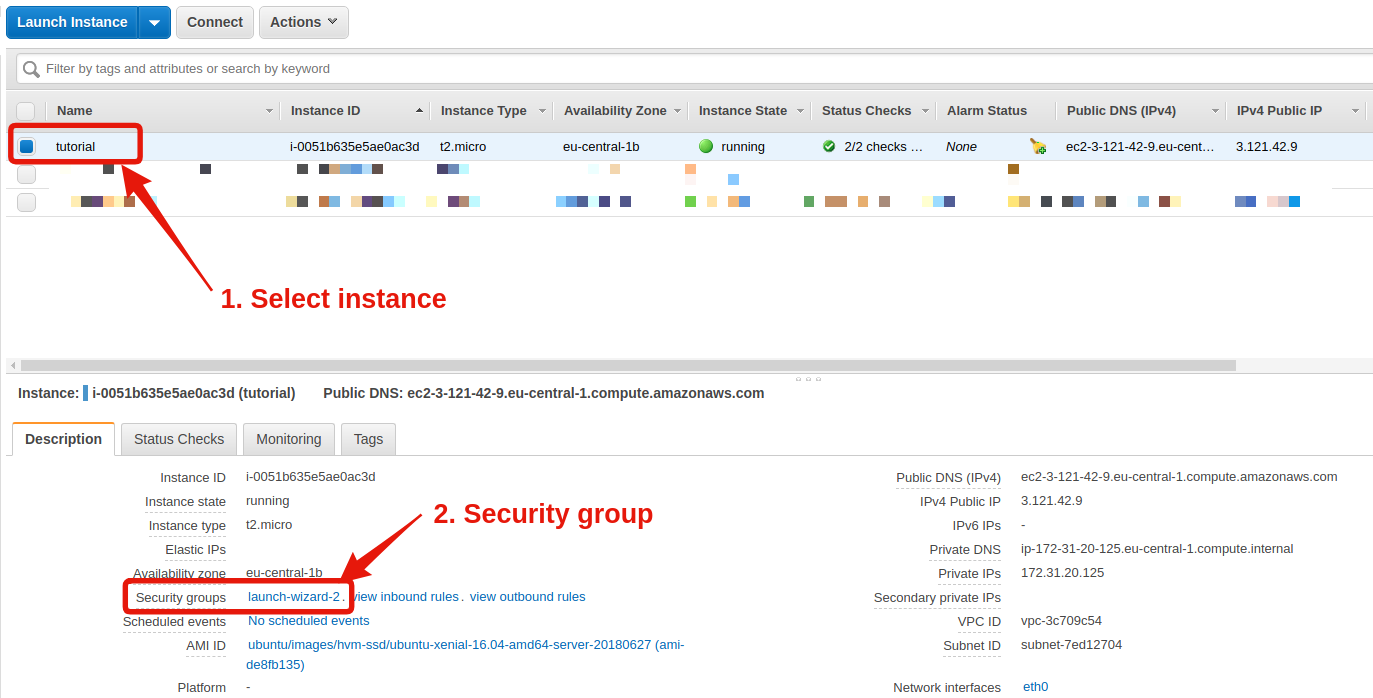
To change that, from your EC2 dashboard:
- Select your instance.
- In the bottom half of your screen, find the line Security groups and click on the link.
- In the new window, again the bottom half of the screen, click on Inbound, the 2nd tab. Notice that only the port 22 is open.
- Click on Edit, and the popup that opens, enter the following settings:
| Type | Protocol | Port Range | Source | Description |
|---|---|---|---|---|
| SSH | TCP | 22 | Custom: 0.0.0.0/0 | |
| Custom TCP Rule | TCP | 3838 | Custom: 0.0.0.0/0 |
Here are a couple of screenshots in case you’re lost:
.
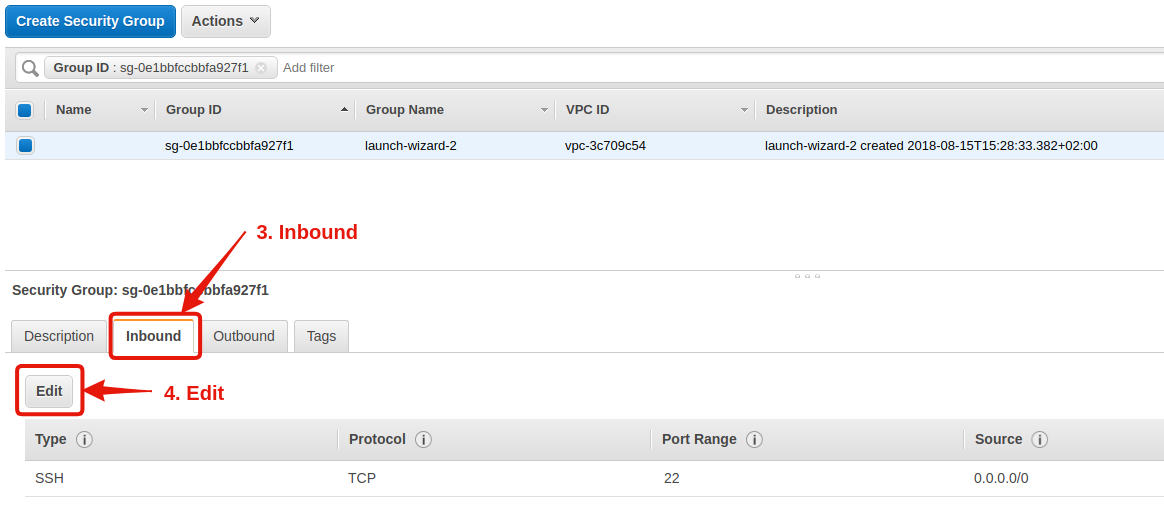
Once the port is open, the app will load!
Let’s try again:
3.121.42.9:3838This time…
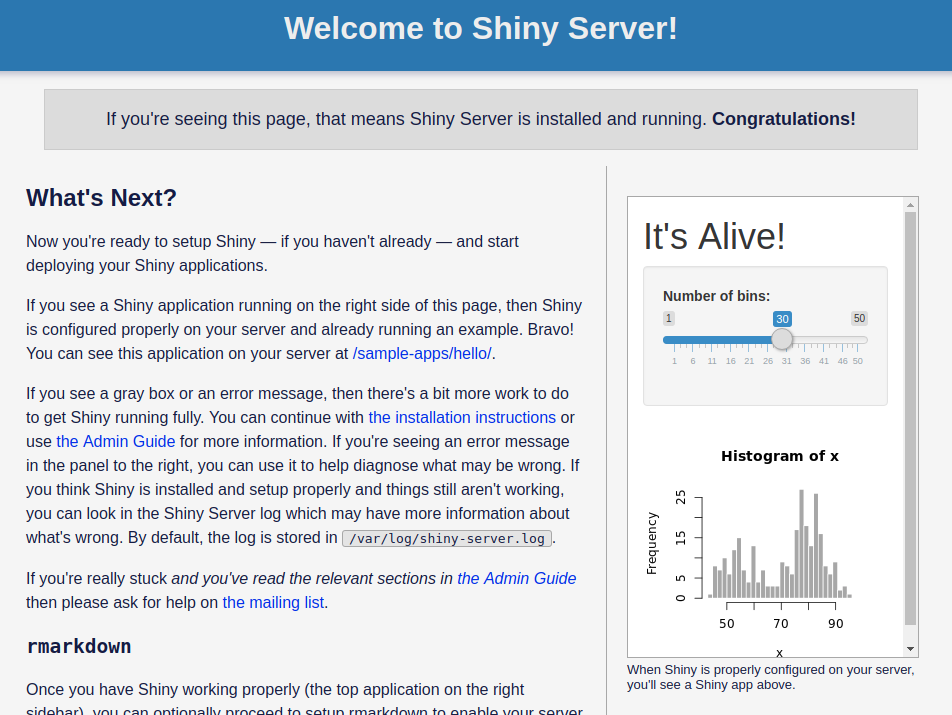
Boom!
It works!
Note: The address is a bit ugly right now. You must type an IP address followed by a port number, erk. In the next chapter, we’ll discuss how to have a readable address and get rid of the port number.
We obtain an HTML page with a couple of Shiny widgets in the right sidebar.
You may get an error message in one of the widgets: “An error has occurred”. This is totally normal, it comes from a missing package.
Okay, cool! But.. how to do put our app now?
2. How to deploy YOUR app on the server?
To do so, we need to get back to the console of the server.
If you forgot, get back to the previous chapter: Install R and R Shiny
First, let’s explore what we have.
Explore your server
We just noticed that when you first install Shiny Server, you get a default app.
This app must be stored on the server, right?
So where is it?
Simply, it’s in /srv/shiny-server. That’s where we will store all our apps.
Type the following in the console:
$ cd /srv/shiny-server/
$ ls
index.html  sample-apps
Notice there is a directory, sample-apps, and a file, index.html.
The file index.html is what you saw when you accessed the app. And it calls the app that is in sample-apps. If you dig deeper:
$ cd sample-apps/hello
$ ls
server.R  ui.R
You find the usual server.R and ui.R, the foundations of any Shiny app!
By default, Shiny Server uses this directory to display apps. You can change it, but I don’t recommend it.
What we’ll do instead is:
- Download our app in a working directory.
- Create a shortcut in
/srv/shiny-server/.
Download the app on the server from Gitlab
First, let’s get back to the home folder:
$ cdAnd let’s clone the app from Gitlab:
$ git clone https://gitlab.datachamp.fr/charles/051-movie-explorer.git
Cloning into '051-movie-explorer'...
remote: Enumerating objects: 9, done.
remote: Total 9 (delta 0), reused 0 (delta 0), pack-reused 9
Unpacking objects: 100% (9/9), done.
Checking connectivity... done.
Good!
Gitlab is really handy when it comes to sharing your app everywhere.
Except that, as we said before, Shiny Server expects the app to be in /srv/shiny-server/.
Create a shortcut in /srv/shiny-server/
The following commands will create the shortcut:
$ cd /srv/shiny-server
$ sudo ln -s ~/051-movie-explorer .
Now, if you display the list of files, you’ll see the shortcut along the other files:
$ ls
index.html  movie-explorer  sample-apps
And we can remove the other files, by the way:
$ sudo rm index.html
$ sudo rm -R sample-apps
Alright!
We added our app in the right folder so… it should be accessible now!
Let’s test it.
If I type 3.121.42.9:3838 in my browser, I get…
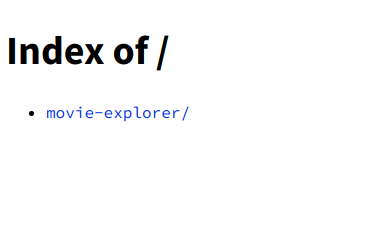
Oops.
Not really welcoming. We’ll change that later.
Click on the link, and…
ERROR: An error has occurred. Check your logs or contact the app author for clarification.
Erk :(
…
Hm.
It seems the server has indeed noticed the changes, but it doesn’t work.
Why?
3. How to configure Shiny Server?
We’ll have to change the config a little bit.
The config file is in /etc/shiny-server/shiny-server.conf.
We’ll open it and try to understand what’s going on:
sudo nano /etc/shiny-server/shiny-server.confThe file should contain the following:
# Instruct Shiny Server to run applications as the user "shiny"
run_as shiny;

# Define a server that listens on port 3838
server {
  listen 3838;

  # Define a location at the base URL
  location / {

    # Host the directory of Shiny Apps stored in this directory
    site_dir /srv/shiny-server;

    # Log all Shiny output to files in this directory
    log_dir /var/log/shiny-server;

    # When a user visits the base URL rather than a particular application,
    # an index of the applications available in this directory will be shown.
    directory_index on;
  }
}
Let’s tackle it line by line:
- First line
run_as shinyindicates the user behind the Shiny Server. When you logged in through SSH, you acted as userubuntu, the default one. But when we installed Shiny Server, we created a new user calledshiny, and that’s the one running the Shiny Server. - Then, we have
listen 3838. That’s the port. That’s why we added:3838at the end of the URL. - The line
site_dir /srv/shiny-servertells you where you need to put the files of the app. That’s indeed where we created the shortcut. - Finally,
log_dir /var/log/shiny-servershows you where the logs are stored. That’s super useful in case something’s buggy. We’ll look into it very soon. - Oh and, the last line
directory_index on, as the comment states, enables the server to show the directories when there is noindex.html. That’s what we saw when we went directly on3.121.42.9:3838. I don’t like it much, so I prefer to deactivate it:directory_index off. Plus, I don’t want everyone to know all the apps I have.
We need to make one important addition to this file. Right at the top, add:
preserve_logs true;This will enable you to keep the logs under any circumstances.
I don’t know why, but Shiny has the bad habit of deleting log files when it considers nothing important happens. But sometimes it does it even when the app crashes.
To take into account the changes, we need to reload the server:
$ sudo systemctl reload shiny-serverSpeaking of logs.. let’s see why our app crashes!
4. How to debug a Shiny app with the logs
To display them:
$ cd /var/log/shiny-server
$ ls
movie-explorer-shiny-20181210-080534-46879.log rmd-shiny-20181023-144836-40079.log
I see two files.
The first one, named movie-explorer, is our app. The second one is from the default app.
The numbers show you the date. Notice the first file was created on 2018-12-10 at 08:05:34. When the log files start to accumulate, it’s very handy to know when it was created.
If you don’t see any file, try to relaunch the app in your browser. That’s the issue of the disappearing log files I was mentioning before. It should be solved with the new config.
If I display the last lines of the log file, I see:
$ sudo tail movie-explorer-shiny-20181210-080534-46879.log
Warning message:
replacing previous import by ‘Rcpp::evalCpp’ when loading ‘later’

Listening on http://127.0.0.1:44533
Warning: Error in library: there is no package called ‘ggvis’
  48: stop
  47: library


Execution halted
Ooooh, right!
We haven’t installed the libraries!
Obviously, it doesn’t work!
Plus, we need to install them for the user shiny, as it’s the one running the Shiny Server.
Let’s do it:
$ sudo su - shiny
$ R
> install.packages("ggvis")
You’ll get asked if you want to use a local library, say yes.
Once the package installed, try again launching the app.
This time, you’ll see some progress:

Something showed up!
..but then it crashed.
If you go back to the log files, you’ll notice a new file was created, and it says:
$ sudo tail movie-explorer-shiny-20181211-083747-41773.log
The following objects are masked from ‘package:base’:

    intersect, setdiff, setequal, union

Warning: Error in : The dbplyr package is required to communicate with database backends.
  56: <Anonymous>
Error : The dbplyr package is required to communicate with database backends.


Execution halted
Another package is missing! dbplyr.
Note: After installing the package for the user shiny, you can go back to the main user ubuntu by typing exit in the console.
Now you know how to install the package.
Oh, and, spoiler alert, you’ll also need to install RSQLite!
And finally…

Yay o/
Note: By the way, if you need to install the dplyr package, you will need at least 2 GB of RAM on your server.
With AWS you can upgrade the server, install the package, and then downgrade once done.
After:
- Creating our server on AWS
- Installing R and R Shiny
- Sending our app on the server
- Debugging the app from the logs
- Configuring the server
We FINALLY can access our app and share it with everyone in the world!
Good job ;)
Now, you probably have some questions left, like…
- How to get rid of this ugly IP address?
- How to set up authentification to restrict the access?
- How to secure the app in HTTPS?
We’ll answer them in the next chapters.
5. Extra: Create a nice domain name
We deployed the Shiny app on the AWS server that we had created. We just had to type 3.121.42.9:3838 in the browser and our app appeared magically!
Yay!
Just as a reminder from the previous chapter, here is what you have on the server:
- You deploy the app in the
/srv/shiny-serverdirectory. - You read the logs of Shiny in
/var/log/shiny-server. This helps to understand why your app crashes. - You can change the configuration of Shiny in
/etc/shiny-server/shiny-server.conf.
These are the three directories you need to remember.
After a while, you get used to it.
Until then, don’t hesitate to reach out to the previous chapters.
Now..
I just said we can reach our Shiny app just by typing 3.121.42.9:3838, and.. that’s kind of great!
But seriously, will you tell your friends to type and remember these numbers?
Or tell your client he has to use these numbers?
Not really..
What would be cool would be to have a really nice-looking URL.
For example, I host all my apps on shiny.datachamp.fr.
Easy to remember, and convenient for everyone.
You can find our app at this address: https://shiny.datachamp.fr/051-movie-explorer/.
How to do that?
Three steps:
- Get your domain name
- Set up the DNS
- Set up a reverse proxy
If you’re not familiar with servers, this might feel complicated.
But stay with us. I’ll guide you through each step with screenshots, as usual.
1. Get your domain name
The first step, if you want to use a domain name, is to get one!
This also means buying one.
Right.
It costs money.
Mine (charlesbordet.com) costs $14.99 per year.
But you can find cheaper ones, sometimes for less than 2$ per year.
I got mine at Hover.com, a company specialized in domain names.
I’ve been using them for years and never had any issues.
I’m also using OVH for .fr domains since Hover doesn’t do them.
I will use Hover in the rest tutorial but don’t worry. Pretty much all domain providers have similar interfaces.
Alright!
So let’s say you have bought your cool new domain name!
Now, you must make the link between:
- The domain name
- The IP address of your server
What do we use for that?
DNS of course!
2. Set up the DNS
DNS stands for Domain Name System.
It is one of the most fundamental services used all over the internet.
Even though pretty much nobody knows what it is.
It’s what allows you to type https://duckduckgo.com in your address bar rather than 23.21.193.169.
In a few words, it makes using the internet way friendlier!
And that’s exactly what we want to do!
We want people to type http://mysupercoolshinyapp.com rather than 3.121.42.9:3838.
Your domain name provider will have a page where you can set up the DNS.
In Hover, simply click on the DNS tab:
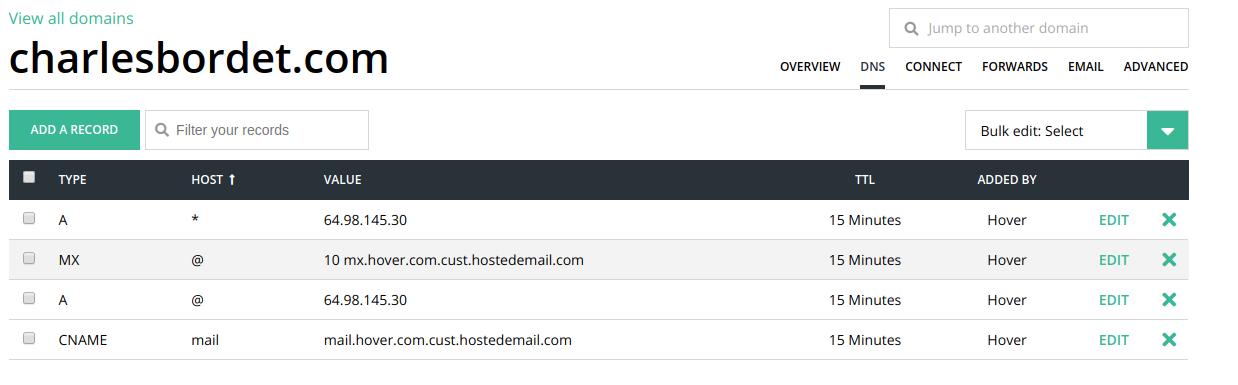
You can see some default entries here that might be different than my screenshot.
If you’re curious to understand what’s going on in this table, check out the blue box. Otherwise, you can jump right after to continue the tutorial.
Each DNS entry indicates where to redirect users when they type your domain name.
Why not have only one entry?
Because you could have datachamp.fr on one server, then shiny.datachamp.fr on a different server, and so on. For each specific use, you must add a new row.
The TYPE column can be A to redirect the domain name towards the IP address of a server. It can be CNAME if you redirect the domain name towards another domain name. It can be MX for a mail server.
The HOST column is for the subdomain. The subdomain is everything before your domain. For example, when I type shiny.datachamp.fr, this is a subdomain of datachamp.fr. The star * means all subdomains. The @ means the main domain (datachamp.fr in this case).
The VALUE column depends on the TYPE you chose. If you choose TYPE A, then you must enter an IP address.
The rest is unimportant for us today.
The default values here tell us that the main domain datachamp.fr and all subdomains *.datachamp.fr are redirected to the IP address 64.98.145.30.
That is not exactly what we want.
What I would like is to have the subdomain shiny.datachamp.fr redirecting directly to the IP address of my AWS server.
To do so, remove both rows with TYPE A, and add this one instead:
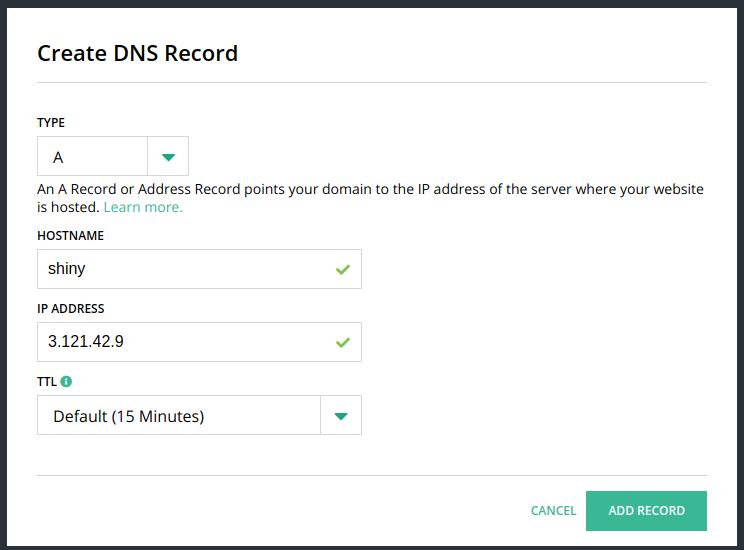
If you don’t want to use a subdomain and you want your main domain to redirect to your AWS server, then write @ instead of shiny for the hostname.
Finally, my table looks like that:
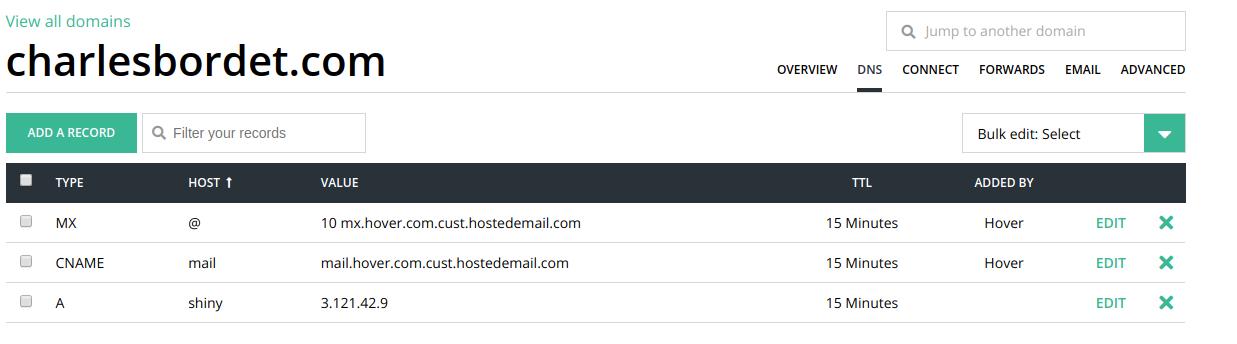
Now, every time someone types shiny.datachamp.fr in his browser, he gets redirected automatically to my AWS server!
We’re not done though!
If you try by yourself, you’ll notice it doesn’t work.
Why?
We haven’t specified a port!
You still need to write shiny.datachamp.fr:3838 to access the app.
Meh..
That’s kind of annoying.
But we’re getting close!
There are two ways to solve this issue:
- The quick & dirty way
- The proper good long-term solution
The Quick & Dirty port removal solution
If you want something quick that works right now, do the following:
- SSH into your AWS server (check part 3 if you’ve forgotten how to do this)
- Open your Shiny config file:
sudo nano /etc/shiny-server/shiny-server.conf. - Change the row
listen 3838forlisten 80. - Restart shiny server by typing
sudo systemctl restart shiny-server.
And that’s it!
Note: Don’t forget to open port 80 in the AWS firewall. See the chapter Open the port on the firewall.
Now Shiny Server listens on port 80 instead of 3838.
Why 80?
80 is the default HTTP port.
In fact, when you type shiny.datachamp.fr in your browser, the browser uses port 80 by default.
Before, we had to specify 3838 because it’s uncommon and it can’t guess it.
So, why is it a quick & dirty solution?
Quick, ok.
Dirty, because if tomorrow you want to install another service on your server, such as an RStudio Server, or a Jupyter Notebook server, or a website, you will face the same issue.
And only one service can listen to port 80 at a time.
If you have a Shiny Server and an RStudio Server on the same machine, they must use two different ports.
They can’t both use port 80.
But you still want to have two clean URL such as shiny.datachamp.fr and rstudio.datachamp.fr.
So, what to do?
The solution is to use a Reverse Proxy Server like Nginx.
3. Set up a reverse proxy with Nginx
I could tell you exactly what to type in the terminal and be done with it.
But that’s now how I teach.
I prefer to have you understand what you’re typing.
If tomorrow you want to do something slightly different, you’ll be able to do it.
So, let’s start with..
What the hell is a reverse proxy?
Think of your server like a house that has many doors.
65,535 doors exactly.
And let’s call these doors ports, okay? porte is the French word for door.
If you want to reach out for some information in the house, you must pass one of these ports, ask the guy behind, and then get back home with the information.
Well, Shiny Server is one of these information providers.
It’s located by default at port 3838.
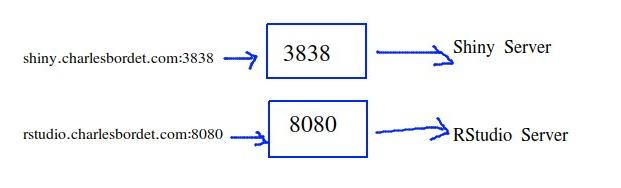
And let’s say you also have a service at port 8080.
That’s the default port if you install RStudio Server.
If you knock at port 3322, nobody will reply, because nobody’s there.
This works.
But it’s not handy because you have to knock at the right door.
As we said before, you have to specify the port number in the URL, such as shiny.datachamp.fr:3838 and it’s ugly.
What if, instead, there was a doorman at the main entrance that could bring you to the right person?
You ring at the main entrance and ask for Shiny Server, and you get to it right away.
And if you want RStudio Server, you ring at the main entrance and ask for RStudio Server.

Wayy easier!
No messing around trying to find the right door.
This doorman is called a reserve proxy.
Nginx is the best reverse proxy server out there.
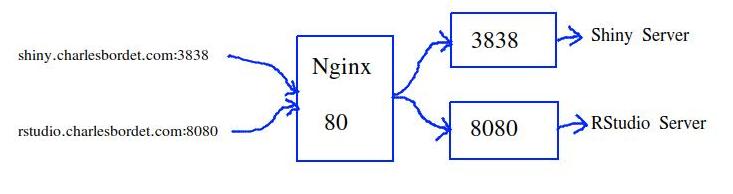
Instead of typing the port number, you can only type shiny.datachamp.fr and talk to Nginx.
Nginx understands you need to access the Shiny Server, so it fetches the right information and get it back to you directly.
To do so, we need to:
- Install Nginx on your server.
- Configure Nginx.
Install Nginx
This is the easiest step.
After SSH-ing to your AWS instance (check part 3 and stop forgetting how to do it), type the following:
$ sudo apt install nginxAnd Nginx is installed.
Easy.
Configure Nginx
Now for the tricky part.
First, change directory (cd) to where Nginx is installed:
$ cd /etc/nginx
$ ls
auth          fastcgi_params  mime.types         proxy_params     snippets
conf.d        includes        modules-available  scgi_params      uwsgi_params
dhparam.pem   koi-utf         modules-enabled    sites-available  win-utf
fastcgi.conf  koi-win         nginx.conf         sites-enabled
The ls command list all the files in this directory.
What’s of interest for us is the nginx.conf file, but we won’t touch it.
Instead, well jump to the sites-available folder and create a new file specifically for Shiny Server.
$ cd sites-available
$ sudo nano shiny.conf
And that’s where we write the config file:
server {
    # listen 80 means the Nginx server listens on the 80 port.
    listen 80;
    listen [::]:80;
    # Replace it with your (sub)domain name.
    server_name shiny.datachamp.fr;
    # The reverse proxy, keep this unchanged:
    location / {
        proxy_pass http://localhost:3838;
        proxy_redirect http://localhost:3838/ $scheme://$host/;
        proxy_http_version 1.1;
        proxy_set_header Upgrade $http_upgrade;
        proxy_set_header Connection $connection_upgrade;
        proxy_read_timeout 20d;
        proxy_buffering off;
    }
}
There isn’t much going on here but it can look intimidating.
listen
The beginning states that the Nginx server now listens on port 80. Exactly what we wanted to do with our Shiny Server.
But since only ONE service can listen on port 80, we give it to Nginx.
In short, we’re telling our doorman to wait at the main entrance.
server_name
The server_name is what the user types to access the app.
In my case, I want the user to access my Shiny app on the subdomain shiny.datachamp.fr.
Replace the value with your own domain name.
location
Finally, everything inside location is the reverse proxy happening.
We’re giving instructions to our doorman:
If the user comes and asks for shiny.datachamp.fr, then guide him through the house at door 3838.
And that’s it!
If you want to use this config file for RStudio Server, you can add a second file called rstudio.conf, and inside you put the same config and only replace two things:
- The
server_name - The port number
There is one thing left to do.
Save the file and go back to the terminal.
We need to create a shortcut inside the sites-enabled directory:
$ cd ../sites-enabled
$ sudo ln -s ../sites-available/shiny.conf .
Why is that necessary?
The deal is that Nginx does NOT look at the sites-available folder.
Only at the sites-enabled folder.
So we create the conf file inside sites-available and then we create a shortcut inside sites-enabled.
Why? So that if tomorrow you want to temporarily deactivate your access to Shiny, you only have to delete the shortcut.
You don’t have to delete the entire conf file and regret it later.
Now that our reverse proxy is set up, we only need to restart Nginx to take into account the changes.
First:
$ sudo nginx -t
nginx: the configuration file /etc/nginx/nginx.conf syntax is ok
nginx: configuration file /etc/nginx/nginx.conf test is successful
This ensures that the conf file is correct.
If you get the error nginx: [emerg] unknown "connection_upgrade" variable, that’s because the $http_upgrade and $connection_upgrade variables don’t exist.
In this case, open /etc/nginx/nginx.conf and add the following lines inside the http bloc:
map $http_upgrade $connection_upgrade {
    default upgrade;
    '' close;
}
Save, and try to validate the syntax again with sudo nginx -t.
And:
$ sudo systemctl restart nginxCongrats!
Note: Don’t forget to open port 80 in the AWS firewall. See the chapter Open the port on the firewall.
Your Shiny app is now accessible on a good-looking URL such as https://shiny.datachamp.fr/051-movie-explorer/!
The last part was not easy, but that’s the best way to do it.
Plus, it comes with other benefits.
Such as..
Making your app secure with HTTPS!
6. Extra: Secure your app with HTTPS
So we changed the ugly IP address of our Shiny app in a good-looking domain name, so that we could reach the app by typing an URL like http://shiny.datachamp.fr/051-movie-explorer.
Nice!
Except there is still a problem.
Especially if you want to put your app in production for a client.
The app is not secured.
You may have noticed the subtle message from your browser:
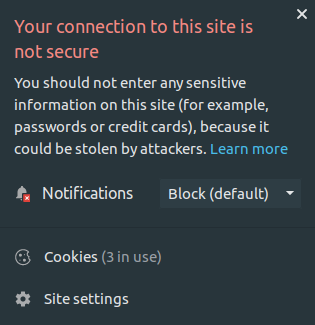
Uh oh…
Indeed, the app is using the HTTP protocol, which is not secure.
Nowadays, everyone uses HTTPS, the secured version of HTTP.
That’s why, in this chapter, we’ll talk about:
- What is HTTPS and why we need it
- How to get certificates SSL/TLS for free with Let’s Encrypt
- How to set up the certificates on your server
- How to force HTTPS over HTTP
Let’s get started!
What is HTTPS?
You certainly have heard of it, but you’re not sure how HTTPS works and why we need to use it.
Well. Imagine that each time you land on a webpage, you send a request from your home to the data center where the webpage is hosted.
Then, a request containing the webpage comes back to you so that your browser can display it.
These messages drive all over the world, from router to router, until they reach their destination.
You don’t control who own these routers, nor what they do with it.
And when you use HTTP, those messages are not encrypted.
It means that anyone can intercept the requests, open them, read them, even change them, and send them back without anyone knowing.

That’s called a Man-in-the-Middle attack.
It’s not cool when the requests contain passwords, data or your credit card numbers.
That’s why we decided to upgrade HTTP into something secure: HTTPS.
HTTPS guarantees that the messages are encrypted. If someone intercepts the request, they can’t do anything with it.
At first HTTPS was mostly used for e-commerce, where the data is confidential, but later on, it was used for the whole internet.
Because privacy is good.
That’s why your browser displays this big red warning.
In short. You want:
- that your data stays secured and encrypted
- that your client or boss doesn’t get scared seeing a warning from the browser
So we use HTTPS.
How?
First, we need certificates (SSL/TLS) for the server. And keys.
I won’t get into too many details, but the certificate says “Yea it’s me the real server” and it contains encrypting keys (a public and a private one).
Create a Let’s Encrypt certificate
You can get certificates from trusted organizations.
Most of the time, it costs money.
But not with Let’s Encrypt. It’s free and automatic.
So.. let’s use it.
They even have some small piece of software to automatically renew the certificates. Otherwise, they expire every 3 months.
So, you do this setup once, and then you won’t have to touch it again.
To get started, visit the Cerbot website:.
Choose:
- Software = Nginx
- System = Ubuntu 18.04 (change if you’re on a different system)

Scroll down and copy/paste the installation instructions in your server. If you don’t remember how to do it, you can go back on the chapter Install R and R Shiny.
$ sudo apt-get update
$ sudo apt-get install software-properties-common
$ sudo add-apt-repository universe
$ sudo add-apt-repository ppa:certbot/certbot
$ sudo apt-get update

$ sudo apt-get install certbot python-certbot-nginx
Then, you can automatically get a certificate by typing:
$ sudo certbot certonly --nginx -d shiny.datachamp.frDon’t forget to change the domain name for yours.
The program will speak to you then:
Renewing an existing certificate
Performing the following challenges:
http-01 challenge for shiny.datachamp.fr
Waiting for verification...
Cleaning up challenges

IMPORTANT NOTES:
 - Congratulations! Your certificate and chain have been saved at:
   /etc/letsencrypt/live/shiny.datachamp.fr/fullchain.pem
   Your key file has been saved at:
   /etc/letsencrypt/live/shiny.datachamp.fr/privkey.pem
   Your cert will expire on 2020-02-04. To obtain a new or tweaked
   version of this certificate in the future, simply run certbot
   again. To non-interactively renew *all* of your certificates, run
   "certbot renew"
The most important part is where it says that your certificates and keys are in the /etc/letsencrypt/live/shiny.datachamp.fr directory.
We’ll use that later.
How to set up your new SSL/TLS certificates with nginx
For this section to work, you need to have an existing nginx configuration.
That’s the optional section I wrote in the previous chapter. Check it here: Set up a reverse proxy with Nginx.
If you haven’t done it yet, go there and come back once it’s set up.
We’ll wait for you.
Remember, you had installed a piece of software called nginx.
nginx is a web server. One of its features is the reverse proxy that we set up last time.
In the previous chapter, I explained that Nginx is like a middleman. It listens on port 80 and then redirects visitors to the correct port (3838 if they ask for shiny for example).
Port 80, that was for the HTTP protocol.
But now, we want to use HTTPS.
The port for HTTPS is 443.
How do I know this?
Each protocol has its own dedicated port. It’s not really up to us. For example, SSH is on 22, FTP on 21, etc.
It’s all listed on this Wikipedia page: List of TCP and UDP port numbers.
It goes up to 1024, and then any number after 1024 is free to use. That’s why Shiny picked 3838 by default (but we can change it).
Anyway.
We’ll change the Nginx configuration to use 443 instead of 80.
As a reminder, here is the path to the config file:
sudo nano /etc/nginx/sites-available/shiny.confYou should get the file we modified last time.
We’ll change a few lines.
1. Change the port
First, let’s change the port number.
Find the two lines that start with listen and replace them with the following ones:
# listen 443 means the Nginx server listens on the 443 port.
listen 443 ssl http2;
listen [::]:443 ssl http2;
2. Configure SSL
Next, let’s add the SSL parameters.
SSL, that’s the encrypting protocol. Think of it like HTTP + SSL = HTTPS.
We should say TLS now, but everyone keeps talking about SSL.
I’m no expert in SSL.
So I can’t tell you every tiny detail of it.
And that’s why I use Mozilla’s recommendations. They have an SSL Configuration Generator.
Check the link and add these lines in the config file:
# certs sent to the client in SERVER HELLO are concatenated in ssl_certificate
ssl_certificate /path/to/signed_cert_plus_intermediates;
ssl_certificate_key /path/to/private_key;
ssl_session_timeout 1d;
ssl_session_cache shared:MozSSL:10m;  # about 40000 sessions
ssl_session_tickets off;

# curl https://ssl-config.mozilla.org/ffdhe2048.txt > /path/to/dhparam.pem
ssl_dhparam /path/to/dhparam.pem;

# intermediate configuration
ssl_protocols TLSv1.2 TLSv1.3;
ssl_ciphers ECDHE-ECDSA-AES128-GCM-SHA256:ECDHE-RSA-AES128-GCM-SHA256:ECDHE-ECDSA-AES256-GCM-SHA384:ECDHE-RSA-AES256-GCM-SHA384:ECDHE-ECDSA-CHACHA20-POLY1305:ECDHE-RSA-CHACHA20-POLY1305:DHE-RSA-AES128-GCM-SHA256:DHE-RSA-AES256-GCM-SHA384;
ssl_prefer_server_ciphers off;

# HSTS (ngx_http_headers_module is required) (63072000 seconds)
add_header Strict-Transport-Security "max-age=63072000" always;

# OCSP stapling
ssl_stapling on;
ssl_stapling_verify on;

# verify chain of trust of OCSP response using Root CA and Intermediate certs
ssl_trusted_certificate /path/to/root_CA_cert_plus_intermediates;
That’s a lot.
And there are a few things to change:
The two first rows: ssl_certificate and ssl_certificate_key. You need to feed them with the certificates we generated earlier.
I changed them with:
ssl_certificate /etc/letsencrypt/live/shiny.datachamp.fr/fullchain.pem;
ssl_certificate_key /etc/letsencrypt/live/shiny.datachamp.fr/privkey.pem;
(Of course, don’t forget to put your domain name)
3. Download the DH parameters
Then, the DH parameter.
The comment tells us to download them. Let’s do it:
$ curl https://ssl-config.mozilla.org/ffdhe2048.txt > /etc/nginx/snippets/dhparam.pem;And then change the path for ssl_dhparam:
ssl_dhparam /etc/nginx/snippets/dhparam.pem;About the HSTS section, I recommend you deactivate it for now.
HSTS is used to tell the browser: “From now on, and for years to come, you only use HTTPS for this domain and never HTTP.”
It’s a good practice.
Except if you have issues to set up HTTPS and want to come back to HTTP, you’re screwed.
And since it’s your first time, you should expect things to go wrong.
Even if you’re following my guide.
So let’s deactivate it for now, and only when we’re sure everything works we’ll activate it again. I’m adding an # before:
# add_header Strict-Transport-Security "max-age=63072000" always;4. Use the Let’s Encrypt certificate
Finally, we’re only left with the last line:
ssl_trusted_certificate /etc/letsencrypt/live/shiny.datachamp.fr/chain.pem;And… that’s it!
It’s test time!
Save the file, and check that there are no syntax errors:
sudo nginx -tYou should get the following response:
nginx: the configuration file /etc/nginx/nginx.conf syntax is ok
nginx: configuration file /etc/nginx/nginx.conf test is successful
If not, it means you have done a syntax error. The error message should tell you what’s wrong.
Once the syntax is validated, let’s restart nginx:
sudo systemctl restart nginxAnd finally.
Check your domain name (type https at the beginning): https://shiny.datachamp.fr/051-movie-explorer.
Note: Don’t forget to open port 443 in the AWS firewall. See the chapter Open the port on the firewall.
Your browser should display a nice lock with a comforting message:
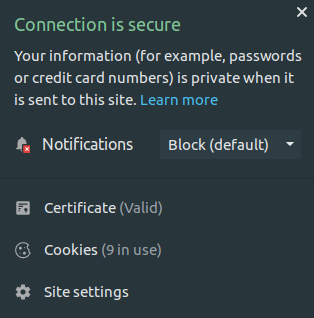
Good job!
We’re done.
Almost.
How to force HTTPS over HTTP
I told you earlier to deactivate HSTS.
Now that everything is working smoothly, let’s activate it:
add_header Strict-Transport-Security "max-age=63072000" always;And we’ll do a second change.
In the SSL configuration generator, they added another server bloc at the top of the file.
Well, this other bloc is listening on port 80, and its only job is to automatically redirect to port 443.
That’s for the users who will visit your app with HTTP.
Instead of getting a 404 page, they’ll get redirected to the secured page.
So, let’s add these few lines at the top of your config file:
server {
    listen 80;
    listen [::]:80;

    # redirect all HTTP requests to HTTPS with a 301 Moved Permanently response.
    return 301 https://$host$request_uri;
}
Now we’re good!
Don’t forget to restart nginx once again:
sudo systemctl restart nginxNow, your app is secured, and the data you send with it is encrypted.
Woah, this is getting serious!
We’re a bit far away from the R language now and we can say we entered the sysadmin world.
I don’t know about you, but I love this new world.
I find it super interesting to learn about how servers work, and even the Internet.
Please share in the comments if you’ve successfully set up HTTPS (or if you’re stuck somewhere).
In the meantime, there is one last topic to tackle in this guide: How to protect the app with a password.
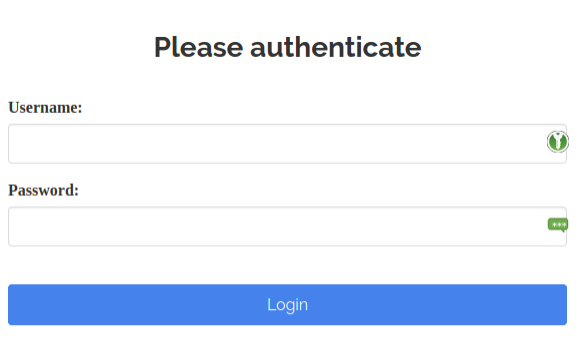
7. Extra: Protect your app with a password
It’s time to learn how to protect your Shiny app behind an authentication portal.
Most Shiny apps I create for clients are internal apps.
They use confidential data and the dashboard is intended to be used by a specific team.
Not by the public Internet.
In some companies, they isolate the app thanks to a VPN.
But sometimes, it’s not possible.
Sometimes you want to open your app to the Internet and restrict it to some users.
And you want to manage their rights.
You are at the right place.
From the simplest solution to the most complex one:
- How to set up a simple password with
nginx - How to use a third-party service like Auth0
- How to create your own authentication portal
Now…
Before we start, a small disclaimer.
We’re talking about security.
I am NOT a security expert.
It’s a real job. My job is analyzing data. Not security.
You are responsible for the security of your applications.
You are responsible for your data.
This article is purely informative.
:)
Now that this is stated, let’s start!
Your choices
There is no best way to secure a Shiny app.
Here are your possibilities:
Shiny Server Pro
Haha.
I’m kidding!
Use your web server - nginx
We have already used nginx as a reverse proxy.
Remember.
nginx is your doorman.
It redirects visitors to the right service. To the right port number.
Another role for this doorman could be to accept or deny access to these visitors.
Rather than letting anyone pass, it could ask for credentials.
This solution works well. It’s easy to set up. And it’s secured.
Use a third-party service - Auth0
auth0 is an authentication service you can integrate into any application.
It’s free up to 7000 users.
The biggest advantage is that you don’t have to worry about security.
That’s THEIR job.
Their expertise.
Not yours, nor mine.
So they know better than us!
However, using a third-party might be an issue for you. It creates dependency. You need to trust them.
Build your own authentication portal

Or: Do It Yourself.
If you’ve read this guide so far, well… you probably like to do things by yourself.
This is the most flexible solution, but also the less secure.
Since you’re not a security expert.
And me neither.
You’ve got to ask yourself…
Is Shiny secure?
Imagine that you add an authentication portal at the start of your Shiny app.
The logic of the code is:
“If the user logs in, then we show the rest of the app.”
First, it means the user does access to the Shiny Server to log in.
Is the rest of the code well hidden? How well?
Could the user manipulate the Javascript console? Or another backdoor we don’t know anything about?
Is the authentication portal resistant to SQL injection? To code injection? To brute force? To DoS attacks?
Answers aren’t always clear.
And even if you can answer to these questions, what about what you don’t know.
So…
This solution works.
And it’s not optimal for security.
Now let’s dig into each of the other solutions.
Use nginx as an authentication server
This is the simplest solution.
And the least flexible.
In short…
You write the credentials in a file.
Then you get an unwelcoming popup at each connexion to the app.
It’s a quick and dirty solution.
But it’s efficient if you have an app that you want to show only to a few people.
For example, to a client.
You want to show him what your work looks like, but to him only.
The simplest way is to host it on your server, create a password with nginx, and share it with your client.
To set up this solution, we use the console once again.
As a prerequisite, you need to have followed along the instructions of the two previous chapters:
Your config file (the one at /etc/nginx/sites-available/shiny.conf) should look like this:
server {
    listen 80;
    listen [::]:80;
    server_name shiny.datachamp.fr;
    server_tokens off;
    return 301 https://$host$request_uri;
}

server {
    listen 443 ssl http2;
    listen [::]:443 ssl http2;
    root /dev/null;
    server_tokens off;
    client_max_body_size 0;

    server_name shiny.datachamp.fr;

    access_log /var/log/nginx/shiny-access;
    error_log /var/log/nginx/shiny-error;

    location / {
        proxy_pass http://localhost:3838;
        proxy_redirect http://localhost:3838/ $scheme://$host/;
        proxy_http_version 1.1;
        proxy_set_header Upgrade $http_upgrade;
        proxy_set_header Connection $connection_upgrade;
        proxy_read_timeout 20d;
        proxy_buffering off;
    }

    # certs sent to the client in SERVER HELLO are concatenated in ssl_certificate
    ssl_certificate /etc/letsencrypt/live/shiny.datachamp.fr/fullchain.pem;
    ssl_certificate_key /etc/letsencrypt/live/shiny.datachamp.fr/privkey.pem;
    ssl_session_timeout 1d;
    ssl_session_cache shared:MozSSL:10m;  # about 40000 sessions
    ssl_session_tickets off;

    # curl https://ssl-config.mozilla.org/ffdhe2048.txt > /path/to/dhparam.pem
    ssl_dhparam /etc/nginx/dhparam.pem;

    # intermediate configuration
    ssl_protocols TLSv1.2 TLSv1.3;
    ssl_ciphers ECDHE-ECDSA-AES128-GCM-SHA256:ECDHE-RSA-AES128-GCM-SHA256:ECDHE-ECDSA-AES256-GCM-SHA384:ECDHE-RSA-AES256-GCM-SHA384:ECDHE-ECDSA-CHACHA20-POLY1305:ECDHE-RSA-CHACHA20-POLY1305:DHE-RSA-AES128-GCM-SHA256:DHE-RSA-AES256-GCM-SHA384;
    ssl_prefer_server_ciphers off;

    # HSTS (ngx_http_headers_module is required) (63072000 seconds)
    add_header Strict-Transport-Security "max-age=63072000" always;

    # OCSP stapling
    ssl_stapling on;
    ssl_stapling_verify on;

    # verify chain of trust of OCSP response using Root CA and Intermediate certs
    ssl_trusted_certificate /etc/letsencrypt/live/shiny.datachamp.fr/chain.pem;
}
This file is getting big! But as we completed it step by step, it’s not that scary.
Now, we add a new location bloc that’s almost identical to the existing one, with two differences:
- The location won’t be the root (i.e. the slash
/) but the/051-movie-explorerdirectory. - Then, we’ll add the password.
Here is the new location bloc that you add below the existing one:
location /051-movie-explorer {
    proxy_pass http://localhost:3838;
    proxy_redirect http://localhost:3838/ $scheme://$host/;
    proxy_http_version 1.1;
    proxy_set_header Upgrade $http_upgrade;
    proxy_set_header Connection $connection_upgrade;
    proxy_read_timeout 20d;
    proxy_buffering off;
    auth_basic "Restricted Content";
    auth_basic_user_file /etc/nginx/.htpasswd;
}
Why adding a location?
We could add only the last two lines to the previous location bloc:
auth_basic "Restricted Content";
auth_basic_user_file /etc/nginx/.htpasswd;
But if you do that, ALL your Shiny apps will be protected by the same passwords.
That’s not what we want.
We want to have some apps that are protected, and others that stay accessible by anyone.
With my solution and a second location bloc, you can choose.
Save the config file.
Now, we fill the /etc/nginx/.htpasswd with the credentials.
It’s super simple.
First, run the following instruction to create the login:
$ sudo sh -c "echo -n 'charles:' >> /etc/nginx/.htpasswd"Of course, you can replace charles by any other login.
Then, the following instruction will enable you to type a password but store only a hashed version of it (for security):
$ sudo sh -c "openssl passwd -apr1 >> /etc/nginx/.htpasswd"That’s it!
You can repeat the operation as much as you want to create other logins.
Now, restart the nginx server:
$ sudo nginx -t
$ sudo systemctl restart nginx
And your app is protected.
Try for example my app at https://shiny.datachamp.fr/movie-explorer-secure/ and notice the authentication popup.
No credentials? No access.
Try:
- login = guest
- password = trololo
And now you can access.
This method is secured because you force visitors to walk through nginx.
And by the way: Don’t forget to block the 3838 port in your firewall.
You can do so in AWS (reverse what we did in part 4)or by using ufw.
Otherwise people could walk around nginx.
Another important point: Use a strong password.
This method is not resistant against bruteforce.
To protect yourself against it, use fail2ban.
Now…
This method works well.
It’s pretty secured.
But.
It’s not flexible at all!
It’s complicated to create new accounts.
No interface.
You have to use the console.
And only you or someone technical enough can do it. It’s a bit complicated.
You can’t automate it.
It’s not user-friendly.
Could you imagine a pop-up like that to log in to an e-commerce website?
Ha ha.
No.
It doesn’t meet all possible needs.
Either you get in.
Or not.
No account management.
No user right.
You don’t even know who the user is in the Shiny app.
So let’s try an other solution.
Use Auth0 as an authentication server
This second solution is a bit more complicated to set up, but has interesting features:
- Security is optimal,
- You can manage users,
- It’s simple.
Auth0 is an authentication and authorization service provider.
Rather than creating our own authentication portal, Auth0 will deal with this itself.
How to set up Auth0
Create an Auth0 account.
Go to https://auth0.com/signup and create an account.
The service is free up to 7000 users.
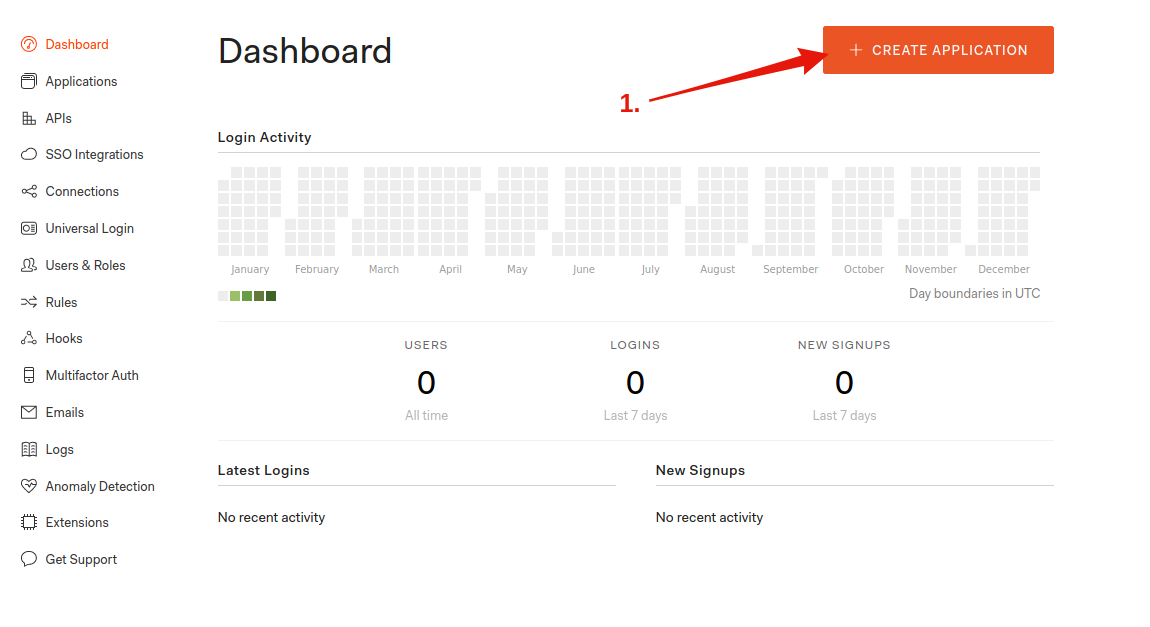
Once the account is created, log in and click on the big CREATE APPLICATION button:
Give it a name and choose Regular Web Applications:
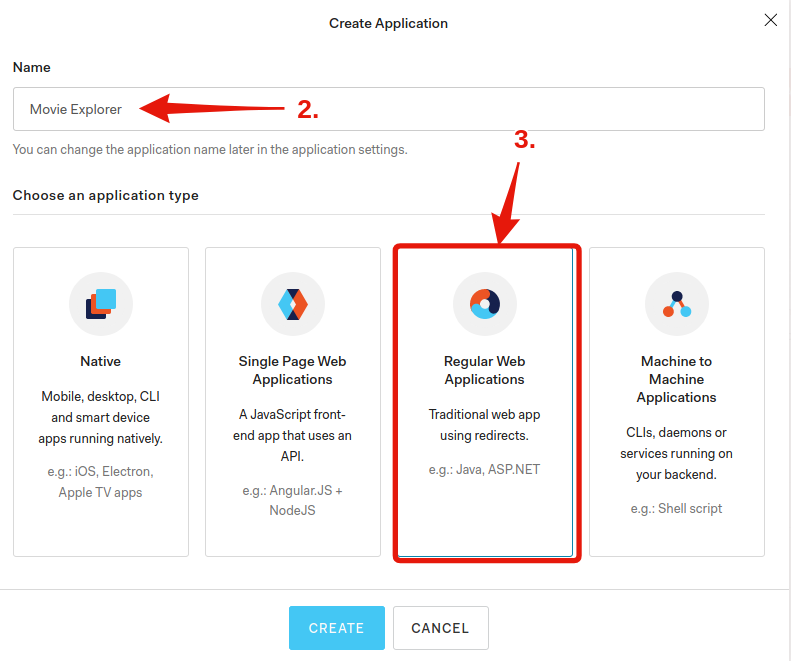
You won’t find Shiny in the default app, so let’s configure the portal manually.
Click on Settings.
Here are the important information to note:
- Domain
- Client ID
- Client Secret
You will need it later.
A bit below, in the Allowed Callback URLs cell, you have to fill in your URL followed by callback.
For me, it’s https://shiny.datachamp.fr/callback.
Warning: No trailing slash /
Save the modifications.
Install the portal on your server.
SSH into it and follow these steps:
1. Start by installing NodeJS.
$ sudo apt update
$ sudo apt install curl
$ curl -sL https://deb.nodesource.com/setup_12.x | sudo -E bash -
$ sudo apt install nodejs
2. Then, install the Auth0 application:
$ git clone git@github.com:auth0/shiny-auth0.git
$ cd shiny-auth0
$ npm install
3. Finally, configure Auth0 with the information you got earlier.
Create a new file named .env (by typing nano .env for example) and enter the following:
AUTH0_CLIENT_SECRET=votreClientSecretAuth0
AUTH0_CLIENT_ID=votreClientIDAuth0
AUTH0_DOMAIN=votreDomainAuth0
AUTH0_CALLBACK_URL=https://shiny.datachamp.fr/callback
COOKIE_SECRET=r7QVJVVxj77CJyuX5tGrE238uLGGh8XZb84c3WdvWgQ5RPVwYc
SHINY_HOST=localhost
SHINY_PORT=3838
PORT=3000
The first four fields are the information you got earlier in your Auth0 account.
The COOKIE_SECRET must be a random string. I used a password generator to get mine.
You can leave the rest as it is.
Alright!
Is our app secured?
Not yet.
Shiny listens on port 3838.
But the authentication portal listens on port 3000.
And we configured nginx to redirects to port 3838.
We have to change that.
Open your nginx config file (at /etc/nginx/sites-available/shiny.conf) and change the instructions for proxy_pass and proxy_redirect:
proxy_pass http://localhost:3000;
proxy_redirect http://localhost:3000/ $scheme://$host/;
I changed the port number 3838 for 3000.
Save the file and restart nginx:
$ sudo nginx -t
$ sudo systemctl restart nginx
Is our app secured?
Not yet!
We broke the app.
It’s not even accessible anymore!
Indeed, we’re redirecting to the Auth0 portal now, but we haven’t started it!
Go back to the shiny-auth0 directory and run the following:
$ cd /home/charles/shiny-auth0
$ node bin/www
The console shouldn’t display anything. And the prompt is gone as well.
That’s because this instruction manually starts the authentication portal server.
It stays this way and will display the access logs.
At least now we can test the portal.
Go to your Shiny app and you should see this:
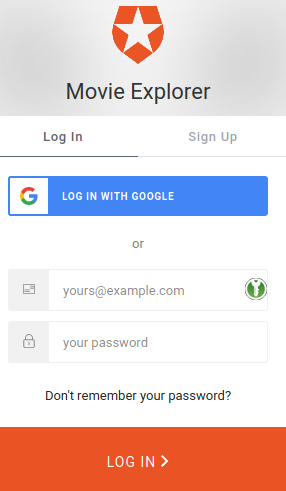
You can create an account. Log in and then access to the app.
Cool!
If you want to get back your console prompt, you have to stop the server with Ctrl + C.
Something is weird though.
We have two issues:
- This manual start is not convenient. Are you supposed to keep the console open all the time?
- The goal is to restrict access, not to offer the possibility to anyone to open an account!
Let’s take care of this.
Create a service for Auth0
We have a few web servers on our machine.
-
The Shiny Server: On port 3838.
-
The
nginxServer: On port 80.
And now, the Auth0 Server. On port 3000.
Why do we have to start the Auth0 server manually and not the others?
The others are services. They start automatically as soon as the machine boots. And the service configuration has been done during the installation of these web servers.
For Auth0, the service configuration hasn’t been done.
We have to do it. Then, everything will be automatic.
It’s not complicated.
Create a new file:
$ sudo nano /etc/systemd/system/shiny-auth0.serviceAnd fill it with this service configuration:
[Service]
WorkingDirectory=/home/charles/shiny-auth0
ExecStart=/usr/bin/node /home/charles/shiny-auth0/bin/www
Restart=always
StandardOutput=syslog
StandardError=syslog
SyslogIdentifier=charles
User=charles
Group=charles
Environment=NODE_ENV=production

[Install]
WantedBy=multi-user.target
Make sure you replace charles with your username.
In general, it’s better to create a new username for each service. Like the shiny username that was created for the Shiny Server.
If the service is compromised, the rest of the server stays safe.
Once the configuration is done, let’s activate and start the service:
$ sudo systemctl enable shiny-auth0
$ sudo systemctl start shiny-auth0
Now, your authentication portal is online, and there’s no need for a manual start anymore!
Let’s tackle the other issue: How to restrict the access?
Create access rules
Go back to the Auth0 account management.
There is a Rules section that will enable you to create Javascript snippets.
Click on CREATE RULE and you will see a ton of possibilities:
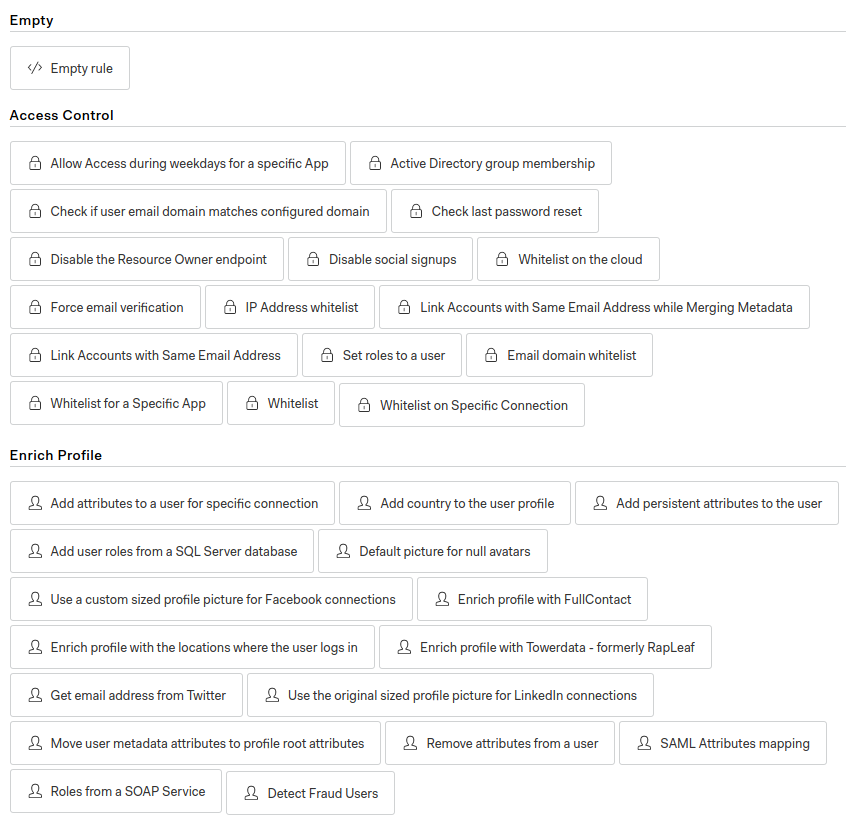
For example, you can:
- Specify a list of authorized emails,
- Forbid social logins (like Google, Facebook, etc.),
- Connect to an API to check if an email is authorized,
- Create your own custom rules.
I must admit this part is a bit intimidating to me.
I don’t know Javascript that well, so I prefer to use only the pre-configured rules.
For example, for a client who wants the app accessible only to employees, it’s easy to limit the access only to emails that look like xxx@companyname.com.
It’s worth noting that being able to use Javascript allows for a lot of flexibility.
You could imagine having a SaaS product with your Shiny app. The buyer is added to your Mailchimp account on a specific list. Then, the rule calls Mailchimp API to check if the email is authorized.
Or the other way around. Your Shiny app is free, but users must create an account and their contact information is sent to Mailchimp, so that you can talk with your users or notify them of new versions.
For us Shiny developers, learning Javascript can’t hurt anyway.
So. This Auth0 service is quite good.
Except I don’t use it much except in very specific cases such as the exemples I just mentionned.
- I don’t like much it uses NodeJS. I don’t know this language at all, so that’s scary to me.
- Using a third party creates a dependency. What if they change their conditions tomorrow?
- While the rules system is flexible, the portal isn’t. What if I want to create a nice landing page?
Hence the third and last solution: Create your own authentication portal.
How to create your own authentication portal with Shiny
Here is the package you’ve been looking for: shinymanager
It’s available on CRAN:
install.packages("shinymanager")You will find some documentation on their Github repo.
But I find it a bit light.
Let’s start with their minimalist example to add the authentication portal.
# define some credentials
credentials <- data.frame(
  user = c("shiny", "shinymanager"),
  password = c("azerty", "12345"),
  stringsAsFactors = FALSE
)

library(shiny)
library(shinymanager)

ui <- fluidPage(
  tags$h2("My secure application"),
  verbatimTextOutput("auth_output")
)

# Wrap your UI with secure_app
ui <- secure_app(ui)


server <- function(input, output, session) {

  # call the server part
  # check_credentials returns a function to authenticate users
  res_auth <- secure_server(
    check_credentials = check_credentials(credentials)
  )

  output$auth_output <- renderPrint({
    reactiveValuesToList(res_auth)
  })

  # your classic server logic

}

shinyApp(ui, server)
It works!
So let’s try to adapt it to our movie explorer app.
As a reminder, the code of the app is available here.
After reading the documentation, we understand we need to:
- Create credentials
- Load the
shinymanagerpackage - Wrap the UI function with
secured_app - Add the authentication module in the
serverpart
Let’s do it!
Create credentials
The easiest part.
I use the piece of code from their example and put it in the global.R file:
credentials <- data.frame(
  user = c("shiny", "shinymanager"),
  password = c("azerty", "12345"),
  stringsAsFactors = FALSE
)
Yup.
Credentials are stored like that.
Not secured!
We’ll come back to it later :)
Load shinymanager
Well, this is the easiest part.
I load it in the global.R file as well:
library(shinymanager)Wrap the UI with secure_app
In the ui.R file, find the fluidPage function.
That’s where the UI starts.
I add the secure_app function around fluidPage:
secure_app(fluidPage(
  # Code inside
))
And don’t forget to close the ending bracket.
Add the authentication module
Finally, I’ll copy/paste another piece of code at the beginning of the server function:
# call the server part
# check_credentials returns a function to authenticate users
res_auth <- secure_server(
  check_credentials = check_credentials(credentials)
)
Boom!
Done.
Except… We created a bug.
Because of ggvis.
It doesn’t like empty data.frames.
And because of the authentication part, that’s what we have.
I tell it to plot something empty as long as we’re not logged in:
vis <- reactive({
  if (is.null(input$xvar)) return(ggvis(data.frame(x = 0, y = 0), ~x, ~y))
  # Lables for axes
  # Reste du code...
})
Now it works!
I’ve put my code here: https://gitlab.datachamp.fr/charles/movie-explorer-login.
And hosted it here: https://shiny.datachamp.fr/movie-explorer-login/.
You can try to log in with the shiny/azerty credentials.
More options
shinymanager doesn’t stop there.
You can also:
- have an administration mode to manage users,
- use an encrypted database to store credentials,
- change the language of the portal.
But…
If you want to offer the possibility to create accounts, you have to do it yourself.
There are still a lot of things you have to do by yourself.
shinymanager is a good starting point.
Not a full solution.
Whenever I create authentication portals with Shiny, I do the following:
- I clone
shinymanagerand add the code to my project - I get rid of all features I don’t need (logs or the admin interface)
- I add my own features
The first time was time-consuming as I had to go through the intricacies of the code.
But now I’m good.
I recommend you do the same.
Plus, you will better understand the strengths and weaknesses of the portal in terms of security.
I add these features:
- Createan account,
- Use rules to restrict who can create an account,
- Add a “Forgot password” link,
- Add cookies to remember sessions,
- Hash & Salt passwords.
In the end…
I like this solution.
Because of the flexibility.
The only drawback is security.
I don’t know what I don’t know.
So be careful.
If you deal with confidential data, ask a professional.
Compare solutions
Here is a short recap of all the pros & cons of each solution:
| Solution | Price | Setup | Dependency | Security | Administration |
|---|---|---|---|---|---|
| Shiny Server Pro | Expensive | Easy | Independent | Good | No |
nginx |
Free | Easy | Independent | Good | No |
| Auth0 | Free up until 7k users | Medium | Dependent | Good | Yes |
| Shiny portal | Free | Hard | Independent | Medium | Yes |
Which one will you choose?
This chapter ends my guide on How to deploy a Shiny app on AWS.
I hope you found it useful!
I know there are still plenty of topics to cover.
Docker, shinyproxy.io, scalability, …
I will write about these.
:)
To get updates, you can subscribe below.
Comments
Greg
Thank you very much for this series. I currently have issues installing dplyr because of lacking memory during compilation. The installation hangs at “compile mutate.cpp” just like in this post. Have you experienced that as well?
Charles
Hey Greg!
I’ve had this issue before, and the only way I solved it was by increasing the memory of the machine I was working on.
If you’re using an AWS server, you can increase its capacity temporarily to install the packages, and once they’re installed, you can decrease the memory again. You need the extra memory only for installation.
Greg
Hey Charles!
I eventually solved it by creating 1GB of swap space with
sudo fallocate. Worked like a charm and didn’t require any changes via the AWS GUI.Charles
Hi Greg!
That’s awesome, I hadn’t thought of that idea at all. Thanks for sharing it ;)
Francisco Goitia
Hi. Thank you for the series, it has been very useful. Are you going to tackle how to optimize the app for multiple concurrent users ?
Charles
Hi Francisco! I have a couple articles to write before that, but yes eventually I want to write about optimizing a Shiny app for multiple concurrent users. That’s a common issue and there are very interesting tools that help a lot when you know how to use them.
Sono
This guide is excellent! What would you need to do if you wanted separate custom domains for different shiny apps hosted in my directory? Would I just use the same procedure that you describe for doing an rstudio server and shiny?
Charles
Hi Sono, I’m glad you like it :)
To create separate custom domains with the same Shiny Server:
Hm I’m not sure actually. My first approach would be to set up a redirection, for example from shiny.example.com/myapp2 to myapp2.com. I will show how to set up a redirection with Nginx in the next article (yet to be written!)
It’s different than having an RStudio Server and Shiny Server side by side, because in this case you can have different ports. Say 8080 for RStudio and 3838 for Shiny. Then you set up Nginx accordingly.
Rich Pauloo
I’ve spent this Sunday following your guide from parts 1-5, and it’s the best guide so far on the topic! Thank you for writing it. I look forward to reading your next two posts on HTTPS and authentication. Do you think you’ll use
shiny-auth0?Charles
Hey Rich! Thanks for the good words :) For the authentication part, I’ll probably use auth0 indeed because that seems to be the best solution at the moment, but I know some people are using others, so I might investigate a little bit over other existing solutions to pick the best one!
Mandip
Hi Charles - I can’t seem to get the config file to save correctly it. I keep on seeing the directory index. Has this ever happened to you?
Charles
Hi Mandip. You must be careful when saving and exiting the file. In the article I’m showing the nano editor because that’s the easiest one, but that’s still way less user friendly than what we’re used to. Don’t hesitate to look at some nano guide on the internet if it helps!
Nagi Teramo
Great article!!
Camilo
Charles I love you man hahah. Your method has worked beautifully. Big hug from Colombia my friend. Now I am stuck at this last post. After executing “sudo nginx -t” the following error comes up:
nginx: [emerg] unknown "connection_upgrade" variablenginx: configuration file /etc/nginx/nginx.conf test failed
I usually do hours of search in stackoverflow and the internet. But this time I’ve had no luck. I can’t see the source of the error. The shiny.conf file is correct. I didn’t touch the “location / {}” section where the “connection_upgrade” is located, yet this error comes up. Help please master.
Charles
Hey Camilo! Thanks for the good words (;
You should check the file in
/etc/nginx/ningx.conffile. In this file, add the following:map $http_upgrade $connection_upgrade {default upgrade;
'' close;
}
inside the
http {}brackets.Let me know if that solves your problem!
Mark
Tried to go back and configure the server and now I’m getting prompted to enter a password, “[sudo] password for shiny”. Was not getting this prompt before.
Charles
Hi Mark!
That’s probably because you tried to execute a
sudocommand with the user “shiny”.sudomeans the administrator (or root), and the user “shiny” has no root access.To get out of the “shiny” user, simply type
exitand you will become root again to play around with the configuration.Makes sense?
Zahra
excellent! I’m just started to learn AWS and connection with R and your articles really helped me.
I am going yo start to make my free aws and try these concepts!
can’t wait to read the new article about HTTPS.
nj
This is one of the best guides I’ve ever used - Thank you!
nj
This went smoothly, but when I did “sudo apt update” it told me:
E: The repository ‘https://cran.rstudio.com/bin/linux/ubuntu bionic/ Release’ does not have a Release file.
N: Updating from such a repository can’t be done securely, and is therefore disabled by default.
Not sure how to fix this, but…thought you’d want to know. I’m assuming this is a serious issue.
DB
Thanks for putting this guide together, it was extremely helpful.
skm
One of the best article I ever read. Excellent!
Eagerly waiting for the next article about https. Any timeline on it and when can we expect that?
Charles
Thanks for the good words :) I’m actually currently working on the next article about https, so it’ll come soon!
leonardo
man, I love you :O) This series is soooooo great! I confess that for the moment I only wandered here and there to get my server running (I am in a rush!!). But I will definitively take the time to carefully study it!
If you could also modify the main page of the tutorial to include the correction of the nginx.conf file that you suggested to Camilo, it would spare people a heart attack :O)
Charles
Hello Leonardo and thank you for the good words ;)
I have updated the article to reflect the changes to the nginx.conf file!
Albert
Just wanted to say thanks for your article. It guided me through getting my app running on a url. Thanks so much for the help, and looking forward to the next articles
Pepe
Fantastic series of articles!! Really helped me get started
But alas, when I thought I was ready to go into production, I found out that Shiny Server Open Source only supports a single session :(
Luckily someone out there had the brilliant idea to develop Shiny, Proxy that takes advantage of Docker Containerization to enable unlimited sessions (among one of its advantages).
I recommend anyone getting more serious with Shiny to explore this alternative. And I would really be eager about reading an article about it ;)
Charles
If by a single session you mean it is single-threaded, then that is correct! Docker and Shinyproxy is one way to circumvent this issue. It’s more about scaling than deploying, so that’s the next level ;)
But yea I’d recommend checking out shinyproxy.io if one is interested in scaling the deployment of a Shiny app.
Kevin
Thank you, Charles!
I have always been in trial & error for R shiny deployment.
The way you explain the concept is very intuitive.
Looking forward to the next series to wrap up the app for greater use.
Rucha Deshpande
Hi Charles. Your article was very helpful to get me going.
As of now I am getting 502 Bad Gateway when I try to secure my app with Auth0
R-Help
Did anyone figure out the issue with the missing repository? Assume that issue prevents this from work?
Charles
Hi Rucha and thank you for the message. I’d love to help you but you’ve got to tell me a bit more about the issue you’re having. The more details I have, the better I can help you.
Charles
Hi! The instructions here might be slightly out of date. I will very soon publish a new version. In the meantime, you can find an official explanation here: https://cran.r-project.org/bin/linux/ubuntu/
Zac
Charles I just wanted to comment that these tutorials are truly excellent. You’ve made a daunting task way more manageable. Love your writing style! Really looking forward to any thoughts you have around Docker and shinyproxy too.
Eva
Thank you so much for making this!
Anh Hoang Duc
Thanks for your guide! It is really comprehensive!
Ayan
Hi Charles, what an awesome informative article. Thanks for this.
I am able to run most of shiny apps I tried so far in aws. However I am getting an error when trying to deploy the KMeans app (which is available in shiny examples) in shiny server. When I am running I am getting error which says
"Error in (function (file = if (onefile) "Rplots.pdf" else "Rplot%03d.pdf", :cannot open file 'Rplots.pdf'
Calls: runApp ... eval -> eval -> ..stacktraceon.. -> palette -> <Anonymous>
Execution halted"
Please suggest
Jeremy
Why not directly upload to shinyio the official one. I’m suffered by the stubborn situation” local fine, deploying comes with problem always”. Not sure why. In China it’s really so few people use R and shiny. Anyway your great words gives me new hope when I’m so desperate to deploy to shinyio.
Charles
shinyapps.io is a hosting service but it might not fit your needs. It’s more expensive than self-hosting. Some prefer having everything on their own servers (data and code). As with any service, there are pros and cons.
Kristoffer
Great guide, however, I could not get section 5. 3: proxy server with Nginx to work. I followed the steps exactly as described but I’m still not able to access the app without using :3838 in the url.
jeroen
I’ve got everything working until the last bit! When I run the auth0 service manually from the folder, I do get the login screen (and my terminal stays busy). However, when I create the service file and try to enable that.. the service file fails after 5 tries and gets killed. I do seem to have the folders correct. Can it be that I can’t do this with my own (digital ocean) user? Or might it be a rights issue in the /home folder? Would love to get some support!
Matt
Thanks for the guide Charles. Found it quite useful. I’m listing a couple of errors and solutions I came across, incase anyone else has similar issues.
Issue with installing shiny- locking issue and auto_ptr deprecated warnings. When attempting to install shiny package, would receive many purple/pink warning messages saying auto_ptr is deprecated, followed by terminal freezing. This was due to the package ‘httpuv’. I updated the instance from t2.micro to t2.small (sudo fallocate may also work for this but I did not try it) and then installed httpuv on its own with install.packages(“httpuv”, dependencies = TRUE, INSTALL_opt = ‘–no-lock’)
Issue with installing devtools - ANTICONF errors. The individual issue will be listed below the ANTICONF error, but here is what I had to do. Quit R and use the following commands in the terminal.
sudo apt-get install libcurl4-openssl-devsudo apt-get install libxml2-devsudo apt-get install libssl-devThis should clear it up, though you may still have to install some of the R packages required for devtools independently (it will tell you which ones at the end of the output when devtools fails to install)
Permissions issue. In the main directory:
sudo chown -R shiny name_of_your_application^assuming your application is in the main directory. If not, list the directory to your app
Matt
Charles,
You rock, this guide is awesome. Thank you very much.
I’ve got to the end and my next step is on AWS, to get a load balancer set up and auto scaling working. I also saw that you mentioned you might write one on docker. So if you are thinking of doing any further blogs, those are topics that I think would be interesting.
But even if you didn’t do any further follow ups, you still have the best guide I could find on the internet. Thanks,
Matt
Kristoffer
So I managed to get Nginx to work. The first problem was that I hadn’t opened port 80 on AWS, because I just skipped the ‘quick and dirty’ section and jumped right down to the Nginx section…maybe you should also put the reminder to open port 80 there? The next problem was that my configuration only works if I put my domain name in the ‘proxy pass’. ‘localhost’ doesn’t work, I have no idea why, I tried the local IP also that didn’t work either.
Anyway, I’m now setting up HTTPS and I get a ‘permission denied’ when I run ‘curl https://ssl-config.mozilla.org/ffdhe2048.txt > /etc/nginx/snippets/dhparam.pem’. Any solution to that? Thank you!
Charles
Hey Matt! Thanks for the good words :)
I am really busy with other projects these days so I have slowed down my writing. The section on docker will not get published anytime soon.
The load balancer is great if your server is showing signs of limitation in terms of RAM or CPU usage. But this shouldn’t happen except if you really have a ton of traffic. What people are usually interested in is paralellizing user sessions, which can be done easily with docker indeed. It is not that hard, so if you’ve followed this guide successfully and managed to set up a load balancer, I’m sure you’ll be able to use docker. It’s only a matter of taking some time to learn it. Have fun!
Charles
Hi Kristoffer!
You’re not the first one telling me about not opening port 80 in AWS. I just added a mention for this in the section where we set up Nginx for the first time.
For the 2nd issue, did you try to run it as ‘root’, i.e. by adding
sudoat the beginning of the instruction? If it still doesn’t work, you can generate the DH key yourself with the following command:sudo openssl dhparam -out /etc/nginx/snippets/dhparam.pem 2048Hope that helps!
Reshma
Very good article. I cannot see the dots in the chart, no matter what I choose. Could you pl suggest what I should I do ?
clemens
Hi Charles
First of all - amazing tutorial.
Thank you so much!
Yet, I am currently stuck by trying to get my HTTP to https. I followed your instructions and everything works… besides that the https simply does not work :-/
I ran https://check-your-website.server-daten.de/?i=d80ce9f3-7888-4d48-acc0-5026109b3d25
and I can see the certificates. Yet, https times out…
Do you have any idea or recommendation? I already tried to “google” for the last 3 days but I just seem to not find a solution…
Charles
Hi Clemens! Most of the time, when the app times out, that’s because of a firewall. Can you check if the ports are open (443 for HTTPS)?
Paulo
Thanks for the thorough guide Charles!
I ran into an issue installing shiny using Ubuntu 20.04 focal.
This guide helped me out, in case someone else runs into the same issue: https://linuxize.com/post/how-to-install-r-on-ubuntu-20-04/
Charles
Thank you for the link Paulo! I will update the guide to refer to Ubuntu 20.04 now that it’s been delivered widely.
Eyal
Hi Charles, an absolutely fantastic tutorial, thank you so much! Everything worked a treat, except for the OAuth integration - following the steps I got an nginx error when I tested it. I’m attempting the shinymanager version now and it looks good though. Thanks again for your hard work, this really explained a lot of technology I wasn’t yet familiar with.
Roberto R.
Hi Charles,
Great tutorial, your level of detail is very refreshing!
I have a question. I am authenticating my app with Auth0 following your steps I am at step 3, where use
node bin/wwwto manually start the authentication portal and it works when I go directly thry my domain, in your case it would be in shiny.datachamp.fr, but doesnt work for the directorty; my app is at mydomain/movie_explorer, for you would be shiny.datachhamp.fr/movie_explorer. (1) I modified the .env to point to mydomain/movie_explorer (2) Changed the Allowed Callback URLs in Auth0 to mydomain/movie_explorer but still getting a 404 Not Found error and then something like this:Error: Not Foundat /srv/shiny-server/movie_explorer/shiny-auth0/app.js:75:13
at Layer.handle [as handle_request] (/srv/shiny-
and more lines, that would crowd your comment section. Is there a way around this. Thanks!
Charles
Hi Roberto! Thanks for the good words :)
To be honest, I haven’t used auth0 for a long time (I prefer implementing my own solution), so I’ll have a hard time lending you a hand on this.
What I’m seeing here, though, is that auth0 is looking for a file at the path
/srv/shiny-server/movie_explorer/shiny-auth0/app.js.Can you confirm this file is present at this path? If not, then either you must find a way to change the path auth0 is using to find
app.js, or change the location of theapp.jsfile.Roberto R.
It is more like multiple instances are not able to find the path I am trying to add authorization for. I think it has to do with some setup either on the .env file or shiny.conf file that make port 3000 be so rigid to only pass thru the domain and not a specific subdirectory .
I would also like to implement my own solutions but I just dont know where to start, if you know examples I would very gladly move on from Auth0.
this is the complete error log:
Not Found 404Error: Not Found
at /srv/shiny-server/movie_explorer/shiny-auth0/app.js:75:13
at Layer.handle [as handle_request] (/srv/shiny-server/movie_explorer/shiny-auth0/node_modules/express/lib/router/layer.js:95:5)
at trim_prefix (/srv/shiny-server/movie_explorer/shiny-auth0/node_modules/express/lib/router/index.js:317:13)
at /srv/shiny-server/movie_explorer/shiny-auth0/node_modules/express/lib/router/index.js:284:7
at Function.process_params (/srv/shiny-server/movie_explorer/shiny-auth0/node_modules/express/lib/router/index.js:335:12)
at next (/srv/shiny-server/movie_explorer/shiny-auth0/node_modules/express/lib/router/index.js:275:10)
at urlencodedParser (/srv/shiny-server/movie_explorer/shiny-auth0/node_modules/body-parser/lib/types/urlencoded.js:91:7)
at Layer.handle [as handle_request] (/srv/shiny-server/movie_explorer/shiny-auth0/node_modules/express/lib/router/layer.js:95:5)
at trim_prefix (/srv/shiny-server/movie_explorer/shiny-auth0/node_modules/express/lib/router/index.js:317:13)
at /srv/shiny-server/movie_explorer/shiny-auth0/node_modules/express/lib/router/index.js:284:7
Charles
Hi Roberto!
Can we move to email so that I help you solve this? (you can find my email in ‘Contact’ above) and send me the following:
- Your nginx configuration file
- The path where you installed Auth0
- Your
.envfile (fill the SECRET variables with dummy values)- Your service configuration (the file that should be in
/etc/systemd/system/shiny-auth0.service)Hopefully we’ll reappear in the comment section with the solution :D
Jaynal
This article are so well structured and well thought, I just love it. Anyone with minimal knowledge can follow and complete the tasks. I just completed it in Ubuntu 20.04 and it is working fine.
Adrienne
A post on the Towards Data Science site appears to plagiarize parts of your excellent article. The listed author is Filipe Rigueiro and the publication date is Jun 23, 2020, with the title “How to deploy your shiny app to AWS In 4 easy steps”. I often see plagiarized material on their site and I try to contact the original author when possible.
Charles
Thanks a lot for the head’s up Adrienne, this is much appreciated! Apparently Filipe’s Medium account has already been flagged and is under investigation from Medium. Hope they will take action and remove the article.
Ryan
Hi,
This article was very helpful. I keep running to an issue with the log where I it shows that packages are installed. I connected R Server to my AWS instance as well, and I can launch my shiny app using the “Run App” button the way that I would with R Studio. I can’t seem to get the shiny app to load onto the IP:3838 though. Any pro-tips?
Also, if I might make one tiny comment- It took me a long time to figure out the “Configure Shiny Server” section. I couldn’t figure out how to save the changes and exit out of that section. I believe it ended up being ctl+x for me.
Charles
Hi Ryan!
I’d be happy to help, but I need more information on your problem. What you describe doesn’t seem to be what the guide shows us to do. What does connecting R Server to an AWS instance mean? We don’t launch a Shiny Server by using RStudio and its “Run App” button.
Brandon Davis
Just to let you know, I use this site every time I want to spin up a new random website with Shiny (as long as I’m not trying to get fancy with shinyproxy). Very helpful, though I do believe certbot process is a bit different if you move to Ubuntu 20.04. I set up the original sites-available/shiny.conf site, and then installed nginx. Then typed: sudo apt install certbot python3-certbot-nginx , then sudo systemctl restart nginx, and then sudo certbot –nginx -d xxx.xxxxxx.com . This updated the shiny.conf file for me and automatically spun up as a secure website.
Charles
Thanks Brandon! When it comes to certbot, it does indeed edit your nginx configuration if you let it so. If you don’t want this behavior, you can write
sudo certbot certonly --nginx -d www.example.com.Jenny
Hi Charles!
Thank you for this fantastic tutorial!
Did you and Roberto ever solve the issue he was having? I am having a similar issue. Thanks!
Charles
Good job on solving your issue Jenny :) We did solve the issue with Roberto, though it took some time. I’ll get back here soon with an explanation!
Jenny
Hi Charles,
I was able to solve my issue. Turns out it was not all that similar to Roberto’s. You can disregard my question. Thanks!
Charles
If anyone is interested, we solved the issue above with Roberto by adding a line to the
locationblock of the nginx configuration. One must add a redirection, for example:rewrite ^/movie-explorer/(.*)$ /$1 break;It’s not enough, as auth0 won’t do the redirection correctly. We changed the code from the
shiny-auth0app, especially the file inroutes/index.js. It’s a bit too complex to explain in a blog comment, but that’s a starting point if you’re trying to do the same thing.Charles
Hi Chris. What you are doing seems correct from my point of view. 1) Having the app in a subdirectory like
/srv/shiny-server/051-movie-explorerand 2) using alocation /051-movie-explorer { ... }. Which seems to be what you are doing. I would try to deconstruct the process to find out the missing piece. Does it work without nginx on port 3838? Does it work with nginx but without authentication? Does it work if you don’t use a subdirectory? Questions like that to find out where the issue comes from.Chris
Hello first of all thx for this great tutorial.
it seems weird but i dont understand how to get rid of the
shiny.in front of my adress and go directly to the domain name.I tried several solution live in the
shiny.conffile adding only the my_domain.com and not the shiny.my_domain.com.I tried to change in the A rule adding the * and not the Shiny to the host name but nohting seems to work.
Is there any way to go directly to my website by typing my_domain.com and not shiny.my_domain.com.
Thx again
Charles
Hi Chris! You need to:
- Edit your DNS. Usually one puts
@for the root domain (charlesbordet.com in my case).- Edit the
server_namedirective in the nginx config. Replace it with your root domain. Don’t forget to restart the nginx server.And I think that’s kind of it. You should be able to follow the entire tutorial and replace shiny.example.com with example.com.
Junde LIU
Amazing! Thank you so much for writing this! Following your suggestions, I’ve moved most of my shinyapps from shinyapp.io to AWS and it saved me a fortune. Also, you’re so patient explaining everything, best teacher ever!
Diana
Hi Charles,
Your instructions worked! I added both the ‘http_proxy’ and ‘https_proxy’ to the global.R file and everything is smooth sailing.
Thank you for your help and for this ultimate guide :)
Diana
Hi Charles,
As many others have noted, you are an excellent teacher!!!
I am having a small issue with my Shiny Server installation. The server is behind a corporate proxy, and any application that wants to reach out to the internet, has to use that proxy. So for example, when I was installing my packages in R, I had to set the environment variable for the proxy, before I could reach the CRAN repo.
Sys.setenv(http_proxy="http://xx.xxx.xx.xx:8080")This worked fine. But lo and behold, when I ran my Shiny app, it appeared to be trying to reach out to the internet to download some CSS and Fonts.
Warning in file(con, "r") :URL 'https://fonts.googleapis.com/icon?family=Material+Icons': status was 'Couldn't connect to server'
Warning: Error in file: cannot open the connection to 'https://fonts.googleapis.com/icon?family=Material+Icons'
78: file
77: readLines
76: shiny::includeCSS
71: material_page
Is there a way that I can tell Shiny server, or the shiny app itself, what proxy to use to make outbound calls to the internet?
P.S. No nginix proxy is being used here. There is an F5 Traffic Manager, which routes request for my URL, to an AWS ELB, which then routes the traffic to my Shiny Server.
Charles
Hi Diana and thank for the good words :)
You need to set the environment variable for the proxy in the Shiny app as well. You can add it in the
global.Rfile if you have one, or at the beginning of theserver.Randui.Rfiles (but: outside of the server and ui function).I also tend to define both environment variables
http_proxyandhttps_proxy(even if the value is the same and uses “http”).Finally, you also need to open the proxy so that it accepts requests to fonts.googleapis.com.
You can test if your environment variable is correctly set by adding a
textOutputand ask to displaySys.getenv("http_proxy").Connor
Charles,
Excellent tutorial. I’ve scoured the Internet for various walkthrough guides on implementing a Shiny app using my own server and your tutorial was by far the best. Although I got hung up on portions of the HTTPS section, the comments section helped me address those issues. Thanks again for your time and detail on this!
Patrick
Hi Charles,
Many thanks for this. It’s been an invaluable help to me. In fact, I came back to ask a question about how to solve the problem of bypassing the nginx password by using the IP address, only to realize you’d already addressed this in the guide. Perfect.
best regards –
Pal
Hi! Thanks for a great tutorial. I’am having an issue with the final part, creating a service for shiny-auth0.
systemctl status shiny-auth0 returnsLoaded: loaded (/etc/systemd/system/shiny-auth0.service; enabled; vendor preset: enabled)
Active: failed (Result: exit-code) since Tue 2021-06-08 07:28:24 UTC; 3s ago
Process: 11759 ExecStart=/usr/bin/node /home/ubuntu/shiny-auth0/bin/www (code=exited, status=1/FAILURE)
Main PID: 11759 (code=exited, status=1/FAILURE)
Do you have an idea what could go wrong here? Best regards
Charles
Hi Pal! This doesn’t tell me much, you need to look at the logs to understand where the issue might come from. Try
sudo journalctl -u shiny-auth0to see the logs.Guilherme
Very good article! I was lost before read it
Everything was working just fine, until the upgrade to get more RAM to install dplyr/tidyverse. 3838 port is not connecting anymore and I am not able to reload shiny-server.
ubuntu@ip-xxxxx:~$ sudo systemctl reload shiny-servershiny-server.service is not active, cannot reload.
Do you have any idea?
Charles
Hi Guilherme! Might be a naive question, but did you try with
startinstead ofreload?Edin
thanks man, I struggled for so long before I found thus site.++
Thanks
Clemens
Hey Charles
Thank you so much again for this post. Amazing guide.
I have my apps running and super happy with the result.
I am at the last step of my journey to have them protected using auth0.
Following the blog, I could make auth0 work by triggering it manually.
Unfortunately, the automatic way
$ sudo systemctl enable shiny-auth0is just not working and I have checked everything 3 times…$ sudo systemctl start shiny-auth0
I have opened the port 3000 in inbound traffic
0.0.0.0/0::/0
Note that I have a dev-… domain from auth0 at the moment and hence have also tried to replace
“Environment=NODE_ENV=production” to “development”.
Thank you so much!
Charles
Hi Clemens!
For your issue, you can try
sudo journalctl -u shiny-auth0to understand what’s going wrong in the systemd configuration.Otherwise, I am now using the
auth0package, which integrates auth0 directly in the Shiny app, and I find it much easier to set up.Clemens
Hi Charles
Thanks!
The log tells me that the .env is missing. Thats surprising, as I can find the hidden file in
/home//shiny-auth0/.env</code>

 I will certainly also look into the auth0 package, many thanks for highlighting it.
NV
Hello Charles,
Amazing tutorial.
I am just not able to get through one step: setting up the https.
So certbot now has an option to let it update the config file, which is what I tried (instead of the manual changes). https://certbot.eff.org/lets-encrypt/ubuntubionic-nginx
And at the end of the steps given on certbot, it says that we should be able to reload the site and have https.
However my site does not load after those steps.
Could you help out?
Alternately, could you post the entire config file after the modifications? I seem to be doing something wrong somewhere in the steps, and it will help if the entire file is there to compare which section is going wrong.
Thanks a tonne again for this extremely detailed and accurate post.
Best wishes!
Charles
Then, it means it doesn’t find it, meaning it doesn’t look at the right place, meaning the working directory is incorrect. I would look in this direction, maybe try to setup the working directory from the systemd configuration.
Charles
Hi NV!
I don’t like using this option because you don’t control what it does on your config file. That’s why I don’t use it in the guide.
Milo
Great writeup, Charles! Excellent tutorial. Thanks for putting this together. It made it painless to set up https for my shiny apps.
Franco
Hello Charles, this is a great tutorial! Most tutorials I read, edits the nginx.conf file but editing sites-availables it’s much more efficient and even nicer.
I followed the tutorial except the domain and DNS part (yet) but don’t know what it’s happening that I get the 404 error. I solved it in a very dirty and unconvenient way, “adding default_server” in /etc/nginx/sites-available/shiny.conf so, my file looks like this:
server {
 listen 80 default server;
 listen [::]:80 default_server;

 server_name example_domain;

 location /051-movie-explorer {
 proxy_pass http://XXX.XXX.XXX.XXX(Droplet ip):3838;
 proxy_redirect http://XXX.XXX.XXX.XXX(Droplet ip):3838/ $scheme://$host/;
 proxy_http_version 1.1;
 proxy_set_header Upgrade $http_upgrade;
 proxy_set_header Connection $connection_upgrade;
 proxy_read_timeout 20d;
 keepalive_timeout 120;
 proxy_buffering off;
 auth_basic "Acceso restringido";
 auth_basic_user_file /etc/nginx/.htpasswd;
 }
 }
I cloned the repository into /home/shinyapps/
├── 051-movie-explorer├── DESCRIPTION
├── global.R
├── movies.db
├── README.md
├── server.R
└── ui.R
And I made the shortcuts to the app directory and sites-available:
/srv/shiny-server/
 └── 051-movie-explorer -> /home/shinyapps/051-movie-explorer

 /etc/nginx/sites-enabled/
 └── shiny.conf -> ../sites-available/shiny.conf
In /etc/shiny-server/shiny-server.conf I edited only three things
1) run_as shinyapps; (#that’s my user for shiny)
2) directory_index off;
3) preserve_logs true;
And in /etc/nginx/nginx.conf I only added the “map” code block you mentioned.
What it’s wrong with this?
Thanks in advance!
Franco
Franco
Hi Charles great guide!
The reverse proxy works fine but when I add a reverse proxy to RStudio Server, the app stops working and I get Error 404. Let me show you the logs.
Before the proxy to RStudio Server:
/var/log/nginx/access.log
XXX.XX.XXX.XXX - franco [29/Jul/2021:01:58:15 +0000] "GET /051-movie-explorer/__sockjs__/n=YVcHEtgxVjXBBexiZ8/info HTTP/1.1" 200 90 "http://XXX.XXX.XXX.XXX/051-movie-explorer/" "Mozilla/5.0 (Windows NT 10.0; Win64; x64) AppleWebKit/537.36 (KHTML, like Gecko) Chrome/92.0.4515.107 Safari/537.36"After the proxy to RStudio Server:
/var/log/nginx/error.log
2021/07/29 02:14:44 [error] 13771#13771: *75 "/usr/share/nginx/html/051-movie-explorer/index.html" is not found (2: No such file or directory), client: XXX.XX.XXX.XXX, server: , request: "GET /051-movie-explorer/ HTTP/1.1", host: "XXX.XXX.XXX.XXX"
<br Then if I kill RStudio Server by deleting the shortcut in sites-enabled and restarting Nginx, the app works fine again.

 It seems that when I make the reverse to Rstudio Server Nginx treats the app as a regular website and tries to find an index.html

 Do you know how can I fix this?

 Thanks in advance.
Clemens
Hey Charles…
Sorry to come back to you again on this.
So I tried to set the working directory in the .service file of auth0 manually by
[Service]...
WorkingDirectory=/home/ubuntu/shiny-auth0
But I am still getting the same error message:
ubuntu@ip-172-31-47-49:~$ sudo journalctl -u shiny-auth0– Logs begin at Tue 2020-08-11 19:13:00 UTC, end at Sun 2021-08-01 07:17:33 UTC. –
Jul 11 13:14:13 ip-172-31-47-49 systemd[1]: Started shiny-auth0.service.
Jul 11 13:14:13 ip-172-31-47-49 ubuntu[20679]: Error: ENOENT: no such file or directory, open ‘.env’
Any help greatly appreciated ^^
Charles
Hey guys!
It’s a bit hard to do support in the comment section. Can you reach out by email with all the logs so that I can help you more easily? We’ll come back here once we have figured out the solution.
Thanks!
NV
Hello Charles,
A follow up comment.
I tried the https procedure again, as per the steps. However I am getting the “Welcome to nginx” page.
The paths in the config file are correct, so I dont think its a path issue.
I am also not able to go back to http stage. I removed the new config and put the old one and restarted nginx, and I still get the welcome to nginx page.
So my website is currently down because of this.
Would be super grateful if you could help out.
Many thanks!
NV
Hi Charles,
So it was not working because I had to add port 443 in the security group that the instance was running on.
I now see that you have answered it in the comments to folks, but you have not mentioned in the tutorial itself, to make sure port 443 is open for https to work. (https://aws.amazon.com/premiumsupport/knowledge-center/connect-http-https-ec2/ )
Could you add it so that folks are helped even further?
Thanks!
Charles
Hi NV,
I’m sorry that your website is down, though it’s very unlikely it has anything to do with this guide.
If you see the nginx page, that means you’re still accessing your page with HTTP, since this page is by default only listening on port 80 (HTTP). Try adding https:// at the beginning of the URL. You also need to setup the redirection from port 80 to port 443, as explained in the “How to force HTTPS over HTTP”.
Charles
Good point! I have added a note on opening port 443!
Raaja Yoga
Does this tutorial need the paid version of Shiny Server or can it work with the free version too?
Charles
Hi Raaja Yoga! The Open Source (free) version of Shiny Server is enough to follow this guide :) Happy reading!
Dan
Re: Clemens (August 01, 2021 at 09:34 AM)
https://www.charlesbordet.com/en/guide-shiny-aws/#comment90
I was getting the same error as you.
Error: ENOENT: no such file or directory, open '.env'Assuming the .env file is the correct directory, this is likely because the service does not have permission to read from the .env file.
Giving all users permission to read the env file worked for me. You could also just give the user that is running the service permission too.
sudo chmod -R a+rw .envHope this helps!
Alt
Thanks for sharing!
The best post i have found on that topic & well explained .
I learned a lot from it (from you:)!
Best :)
Sicily Fiennes
Hi there! I’m wondering if you could share some steps to moving local app files on the shiny server on ubuntu? Mine is not on GitLab - any advice would be greatly appreciated!
Charles
Hi Sicily! If your files are not on a git repository, you can use SCP to transfer files from your local computer to the server. If you use Windows, check out WinSCP which is fairly easy to use. You will need to provide your SSH credentials to use SCP.
Manu
Hello Charles. Just a note with a big thank you for the tutorial. Have a great day!
Andrew Lou
Hi Charles, thank you so much a great tutorial! I am having trouble getting rid of the :3838 in my URL. When I try to run Nginx, my URL gives me a 502 Bad Gateway error. Any idea why that might be?
Muldeh
Kia ora, excellent guide. I already had a shiny server set up on AWS but found this guide when I was looking at how to secure it.
Decided to follow the guide to set up a new server since I needed to make one in a different AWS region anyway and it went very smoothly - much better than the first time I did it.
I don’t currently have a domain though.. Ill give shiny-manager a try and see if that will do auth without https/a custom domain.
*I will of course use a proper domain and https eventually I’m jsut doing a proof of concept at the moment).
Just wanted to say thanks and I love the way you write.
JWR
Partly working, just leaving the comments here for others…
the shiny-auth0 package, in case your SHINY_HOST is a https host (think deployed on a cloud provider like google) just change the file: reports.js
find the create proxyserver part and add the https and the changeOrigin.
 var proxy = httpProxy.createProxyServer({
 target: {
 protocol: 'https:',
 host: process.env.SHINY_HOST,
 port: process.env.SHINY_PORT,
 },
 changeOrigin: true,
 });
Andrew
Hi Charles, thanks for the great guide. I have been able to successfully follow and get my unsecured page running, but I cannot get nginx to run no matter what I try. I was able to get certbot to work (using instructions for standalone) and have my SSL certificates, but there doesn’t seem to be a way to get around using nginx for configuration. When I try to start or restart, I get the message “Job for nginx.service failed because the control process exited with error code.” Error log says it can’t bind to port 80 despite my shiny.conf specifying listen 443. I’ve tried just about every bit of advice I can find on stack overflow including a full purge and reinstall of nginx. Any leads?
Charles
Hi Andrew!
It’s hard to tell without getting into the server. However, here are some hints that might help you.
If It tells you you can’t bind port 80, it’s likely because something else is already listening on port 80.
1) In your Shiny Server config, are you listening on port 3838? That’s in
/srv/shiny-server/shiny-server.conf.2) In your nginx config, did you remove the default configuration? The file in
/etc/nginx/sites-enabled/default. If it’s still there, you can delete it.3) If everything is correct, did you take the changes into account?
sudo systemctl restart shiny-serverto restart the Shiny Server. Thensudo nginx -tandsudo systemctl restart nginx.Chris
Hi Charles. Thanks for a great tutorial. I have a question related to using Nginx to password protect. So I have a subdirectory within
/srv/shiny-server/(I’m using thesite_dirhosting model) that contains my app source files. I want to only protect this one app in the directory tree. My understanding of your solution is to create a secondlocationblock that matches the request URL like thislocation /name_of_subdirectory { ... auth_basic ...}. Now when I go to my app hosted on EC2, (e.g. https://domain/name_of_subdirectory/) I get the “this page does not exist” error. Perhaps there’s something missing in my understanding and it’s hard for me to know how you have set up your tree under/srv/shiny-server/. But it seems like/051-movie-exploreris a subdirectory containing your source files, is that correct? Thank you so much!Augusto
Hello Carlos, can you upload a tutorial with everything dockerized? Very helpful series.
Charles
Hey Augusto! That’s the next step :) I’m writing an extension that uses Amazon ECS to have a fully dockerized and auto-scaling setup. You’ll have to be a bit patient though!
Rubert
Hey Charles, I think a useful addition to the ‘Step 2: Create an AWS Server’ is to mention that the ‘Regions’ drop down list (top right section of the AWS Management Console) might have to be changed. I used the default (N. Virginia) at first and I couldn’t connect to the instance due to my companies firewall, so I changed to (ap-southeast-2) and it worked a charm.
Michael
Hey Charles! :) Thanks for a great guide. As a newbie I really appreciate your step by step approach.
I would like to ask you if there is an easy way to update R? Current version:
[1] “R version 3.4.4 (2018-03-15)”
Nara
Love your post. It is amazing. Just want to add that Certbot made it super easy to get a certificate and have Certbot edit your nginx configuration automatically to serve it, turning on HTTPS access in a single step with command
sudo certbot --nginxAltv
Great tutorial! second time i use it (saved it in my bookmarks).
learned a lot from you. so well explained!
Thanks!
Hector
Hi Charles - great tutorial. I am trying to set up the ShinyManager with the encrypted SQLite database. I have downloaded the libsodium-dev library onto the ubuntu server but am struggling to organise the keyring access and keep getting the below error in the logs:
Warning: Error in b__file_keyring_autocreate: The ‘system’ keyring does not exists, create it first!
Justin
Thank you so much Charles. I’m sooo nearly there! I can see the default app, but when I check the log file for my own app I get. Any idea how I can troubleshoot that?
su: ignoring --preserve-environment, it's mutually exclusive with --login -bash: line 1: cd: /srv/shiny-server/test-app: Permission deniedJustin
Hi - answering my own question in case it’s helpful. In the log I got this error:
-bash: line 1: cd: /srv/shiny-server/test-app: Permission deniedTurns out it was a UNIX permission error: if I assumed the role of the user (shiny) by running:
sudo su shinythen tried ls, I gotls: cannot open directory '.': Permission deniedThe solution was
sudo chmod 775 .Now my app is up and running I just need to change the URL. Wish my luck!
Ik Tsin
Hi,
I just want to say thank you for posting this tutorial. I learned a lot from it. By following the steps, I successfully deployed my app on an AWS server.
Many thanks!
Mohit Pandey
This is great article I have come accross, thank you so much. I just wish to ask, I always push shiny folder from github and therefore If i have to modify the ui or server then I have to again push correction file with different name, is there any method to update the file inside srv/shiny-server I try doing it using winscp but i am getting error as permission denied
Josh
This is an incredibly detailed article that helped me tremendously in setting up my Shiny App on an EC2 instance, far cheaper than hosting at shinyapps.io would have costed. Thank you so much!
Kai
Hi Charles,
Is there any reason why this guide wouldn’t work using Shiny for Python? I’m wondering because there are no instructions for AWS deployment on the Shiny for Python website (https://shiny.rstudio.com/py/docs/deploy.html)
Charles
Hello Kai!
I haven’t had the opportunity to use Shiny for Python yet, though most of this guide should be re-usable for hosting it. Instead of installing R and its dependencies, you will need to install Python. Maybe you’ll have to update the Nginx configuration as well.
Leave a Comment
Required fields are marked *